Dear Little Emily, When you grow up, you’re going to keep singing with Mum, at the folksong retreats. Mostly the old ballads and work-songs that you usually sing, with all the spirituals that tie your hearts up into warm packaged balls of hope. And also sometimes songs Mum’s written. Like this one:
Well I know your Darn Dog done been here, Done been here, neighbour, done been here! I know your Darn Dog done been here, He done blessed my yard and gone.
Mum is really never going to stop writing parodies. This one is of “I Know My Good Lord Done Been Here”, and you’ll be mighty glad Daddy will be dead by the time she writes it, because he’d sure not appreciate the vain usage of his Lord’s name! Haha. Pretty sure you would have sung it to him if she was going to write it while he was alive. Sometimes you’ll be so embarrassed, though, and this is no exception, although by the time you sing this, you’ll be me—your adult self—and have learned that a little embarrassment is worth the reward of a great memory.
Good morning, Mr. Otis I wonder where you’re bound You look like you’re on a mission And you’re walking on landscaped ground
Well I know your Darn Dog done been here, Done been here, neighbour, done been here! I know your Darn Dog done been here, He done blessed my yard and gone.
One of Mum’s favourite memories to tell, is of Mickey O’Flaherty. Even his name seems to delight her, and the stories fall out of Mum all your life long. I know you know this already. You’re around ten. But it never stops—I promise.
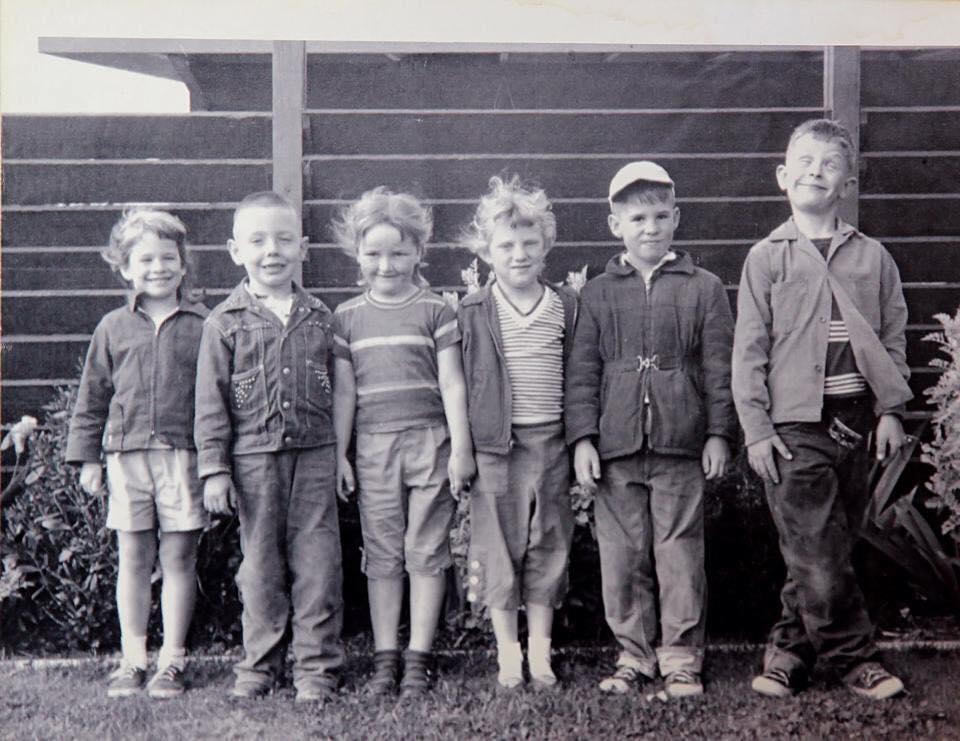
Mum has a framed photo on her wall of herself and Uncle Jim, and a bunch of their friends standing in a line on their street in Mill Valley, where they grew up. Six kids. Uncle Jim is the weirdo on the right with his legs and eyes crossed. Mum is third in from the left, and just beside her sheepish grin, Mickey O’Flaherty’s ears stick out. He looks like he’s just about to say something. Maybe that’s my imagination. He apparently had a lot to say.
Mum likes to tell about the protest signs Mickey put up on his front lawn, declaring “My Mother won’t give me hot chocolate!” and other such things. Apparently Mickey used to have breakfasts at little Mum’s house in the mornings, before they went off to school with Katie and the other kids. He spent a lot of time at Mum’s house. Grandma looked after him, I guess, because his mother was single. I guess like Mum was single for a little while after she left Daddy, and you both lived in the apartment, and Pappa brought you groceries, before he became your Pappa. So I guess maybe you have Mickey’s sense of humour to thank for Mum’s silliness. And perhaps this song.
You know that poodle Mitzi She’s easiest to find She’s just like Hansel and Gretel She keeps leavin’ her crumbs behind
Well I know your Darn Dog done been here, Done been here, neighbour, done been here! I know your Darn Dog done been here, He done blessed my yard and gone.
So the best story goes like this: There was some rude neighbour—and that’s important—he wouldn’t have met the same fate if he hadn’t been rude to children. And on top of all that, his dog used to poop all over the neighbourhood. So (and Mum swears this was Mickey’s idea), she and Mickey did a community service and picked up all this neighbour’s dog’s poop, and gift-wrapped it beautifully. They tied it up with a string and put a neatly-written note on top, that said, “Your dog did this. Be proud!” Then they set it on the neighbour’s doorstep, rang the bell, and departed. I used to walk out barefoot When I was just a lass I don’t walk barefoot anymore Because there’s danger in the grass
And I know your Darn Dog done been here, Done been here, neighbour, done been here! I know your Darn Dog done been here, He done blessed my yard and gone.
So when you’re all grown, little Emily, you’re going to make a big road-trip down the coast, with your own teenaged children, and you’ll stop in Mill Valley, on Meadow Road, to look at the house our mother grew up in. The house will look rather as she described it: A single-story home with a garage and a lawn. You can imagine little Mum on that lawn, spread out with Mickey and Katie and maybe Uncle Jim, all painting on scraps of cardboard, some kind of creative advocacy for their rights. Mum spent her whole life advocating for children’s rights, as a preschool teacher. Although by the time you’re grown she’ll be an infant development consultant, doing the same thing. Did their exploits inspire her?
Around about now, when you’re ten, Mum and Pappa want to get you a passport, but Daddy won’t allow it. He’s fighting for custody of you, and I know you’re scared. Scared that every time Mum and Pappa come back from that courtroom it will be to say goodbye; to send you off to Daddy’s house forever. I wish I could tell you right now, Mum would never let that happen. She may not have money for a lawyer, and she may just be a preschool teacher married to a bearded man with a woven tie who cringes at the sight of documents, but she knows how to speak up for herself and your rights, and she’ll find a lawyer at the last second; a friend who is a straight-standing, clean-shaven man in a crisp suit and who will walk into that courtroom and silence all those people trying to take you away from her. He’ll silence them just by walking in like he belongs there. He walks like a man who knows he’s worth something. Like maybe his mother was like your mother, and knew how to give children a voice. That friend will save your life that day, little Emily. But he’ll be there because Mum was brave enough to ask him. And maybe all of it because she and Mickey developed their voices as children, so they could speak up when others couldn’t. Good morning to you, neighbour And how do you do? I’d ask you in for coffee But you’d get dog shit on your shoe!
And I know your Darn Dog done been here, Done been here, neighbour, done been here! I know your Darn Dog done been here, He done blessed my yard and gone.
Sing the songs, little Emily. No matter how embarrassing. You never know where they came from nor what importance they carry. Sing the songs with your friends, now, and with your children and their friends, later. You’re going to be a teacher, too, and an artist, and you, too, can give people a voice, even though right now when you’re ten you don’t feel you have one at all.
I think it’s the struggle we go through as children that gives us the courage and power to stand up for others, later on. I wonder what became of Mickey O’Flaherty. What will your fear of going to Daddy’s house do for you? Your fear of speaking up, and the danger of not speaking up? I mean – I’m almost fifty, now. I kind of know what you’re going to do with your life. But I think I’ll leave that to you to discover, as you go. Sometimes the joy is in the finding. Unless it’s poop you find, I guess.
Well I know your Darn Dog done been here, Done been here, neighbour, done been here! I know your Darn Dog done been here, He done blessed my yard and gone.
Dear Little Emily is a series of letters to my childhood self, exploring loss, love, and personal growth.
~*~
Dear little Emily, Do you remember Mum’s friend Katie? I mean, of course not, because we weren’t born yet. But I know Mum told you, with a sparkle in her eyes. When Mum was a girl, and lived in Mill Valley, Katie’s mother used to take her temperature every morning before school, in the little cookie-cutter house that was just like Mum’s, and sometimes Katie would bite the thermometer in half, and pour out the silver-heavy drop of mercury into her hand, and carry it out to play with. Mum and Katie delighted at the way the mercury rolled over their hands; wondered at the pure and clandestine droplet of magic. Funny to think that it was poison, when everything about it was so curative—the thermometer, the naughtiness, and the friendship.
I was thinking of this while taking my temperature, today; looking for the fine line of silver on the old thermometer that has survived for decades while countless surely-better digital thermometers died and went to plastic heaven. Like Mum. Is there a heaven for children who grew up to have their own children, and worked their lives away, and then retired and died of brain tumours, cut just under their white and beautiful hair, just as we expected them to finally start living? Is there a heaven for children who treasured and understood the joy of play so well that they grew up to teach and care for children all their lives; to learn and practise and master the art of growing through play? Children who played with mercury? Like Mum?
Little Mum sat in her classroom after she’d moved north from Mill Valley, and stared out the window at the first snowflakes she’d ever seen. Her teacher rapped the back of her hand with a ruler, to punish her for not paying attention. Mum grew up to have her children in Canada, where she delighted in the snow falling, and rolling and jumping and sledding in it, and in skating on the frozen lakes. She took you and little Adrian out to play not only in the snow, but the waves and the forests and the fields of most beautiful grasses and flowers and insects. She married a man who brought you gifts of found animals—almost-pets that you could never keep but who opened your hearts to a sense of wonder. You and Adrian will both become teachers. You and Adrian will never stop playing, even though the constraints of our worker-hungry world will try to make you.
Right now, little me, you’re ten; maybe eleven. You think Mum’s harsh because she says you really do have to learn the long division, even though it’s obviously stupid. Like a game of numbers that has no purpose but to prove your insufficiency. Like the barely-visible stripe on the thermometer: Always insufficient. Always too low to mean staying home from school. There is no such thing as a proficient thermometer.
Mum says babies are born proficient. They can breathe, and pee and poop, and they take only a day or so to learn how to nurse; no time at all to learn to cry, to tell us they need us. They need our love. And in that warm circle of our love, they grow. By the time they’re a month old, they’re proficient at so many things, from telling us when they need a diaper change, to when they’ve had enough milk, to using their ears and eyes and fingers and tongues to explore their growing world. And as soon as we notice these proficiencies, we try to control them.
By the time they’re a few months old, babies have learned to navigate our systems and controls; to cry only enough to get what they need, even if love is not available; to make do in a world that is ever-more restrictive. They’ve learned to grow despite the challenges we present. And by the time they’re half-grown, like you are, now, my little old self, they’ve learned to hide their true selves away: to master the art of appearing-to-be-doing-something, while growing in secret; breaking the thermometer to go do science at the back fence on the way to school. By the time they’re twenty, they’ve come to recognize the restrictions were for their safety, and by the time they’re thirty-five, like Mum is now, in your world, little Emily, they’ve learned to tell their children to finish their long division homework. Even if they wish they didn’t have to.
I’m almost fifty, now, little Em. I took my temperature, today, because I have Long Covid, and I get a fever from over-exerting myself, like I did today, by visiting with my Aunties. I wanted to break the thermometer, but I guess I was never as brave as Katie from Mill Valley in Mum’s childhood. I’d be so angry if my own children behaved so recklessly. What have we done? What have we done to ourselves, and our children, and our future?
Not wanting to be the parent our mother was, but inspired by her knowledge about child development, and by my own teaching experience, I ended up unschooling our children; Mum’s grandchildren. Much to her initial concern, but I did it anyway. I explained that it was like taking the premise of her child-centred preschool and expanding it to the whole life of the child: To present and encourage opportunities for growth, and to always support the children in their endeavours, while being a bit of a safety-net, on the other side.
One day, before Mum’s dead, you will show your children the game of long division. You’ll sit them at the dining-room table, your eyes full of excitement, and show them how the numbers fall into place like satisfying blocks tumbling into their designated holes in the block-sorting-box. Your daughter will expand the game into a mind-bending board-game, and your son will revolt, but then go on to take a calculus course at a local college, in his teens. For fun. We can’t always know how a child will experience wonder, but we can make space for it.
The unschooling “worked”, you might say. Your one-day kids are grown, now, and living independently; supporting themselves with varying degrees of financial security. And they’re happy. They live their lives in the world I failed to change, but somehow they are the change. I never gave them a mercury thermometer in their lives, because I was afraid they’d break it for fun, and maybe poison themselves.
Little Emily, I’m sorry you have to do your long division. I’m sorry you also never were left with a fun little stick of mercury to break out and roll around in your palm. But you had salamanders and frog’s eggs. You had trees to climb at lunch hour. You had a mother who took snow days very seriously, as she did “town days”, which meant getting out of school and going for adventures in town. And she won’t flinch much, when you tell her her grandchildren are leaving her preschool not to go to school, at all. She’ll cringe and fight it just a little before she, like all humans do, grows from the experience. She’ll sometimes take them for town days, too. And give them silly putty to play with, even when they’re ten or eleven, and listening to music that horrifies her. She knows what matters to them, as it does to all people growing. Even to aging preschool teachers who are about to die of brain cancer, and just don’t know it yet.
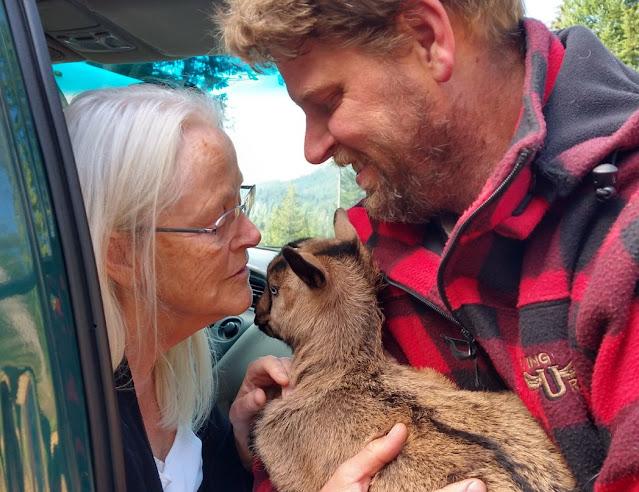
What matters is nurturing growth. Play. Discovery. Mum never lost the ability to wonder; to make space in her own life for joy. Just before she died, last year, her movements and language oppressed by the tumour’s growth in her left parietal lobe, her heart broken by the grief of saying goodbye, Mum went to visit Adrian’s new baby goats. The last trip she made outside of her house in this life was to look lovingly into the eyes of these babies as she did thousands of times in her life, with baby humans. She couldn’t speak anymore, but her eyes tell me she saw those babies’ potential. She saw their little growing selves and all the dreams they didn’t yet know they were going to dream.
Wonder. Mum didn’t look at them to see their sense of wonder, but I know that seeing the wonder in those babies’ eyes connected her to her own. The wonder we allow children to experience is what can sustain them through a lifetime of having to make do in a world that is never ideal. Wonder gives them a space to discover, learn, and grow. And in the end, when their lives are coming to an end, it gives them joy.
After Mum died, I dreamed I was holding her on my hip, and turning around in our yard, as she pointed wordlessly to the sparkling needles on the trees, the flock of singing birds flying by, and then the bulbs coming out of the snow and blooming. We turned further and she pointed at the veggie seedlings on the black earth, and the worms and beetles and pupae in the ground, bustling about their lives. We looked up, and she pointed at the sky, which had become a prismatic dome of light, shining above us, in a perfect white that somehow let its rainbow self show at all the edges. A matrix of wonder.
Little Emily, our mother was a conduit of wonder. She knew what children and all people need for growth, and she did her best to give you that gift.
In 2023 the CDC released this report, which pertains to data that has since been removed from the CDC’s website, because it referred to what the Trump administration calls “harmful” “gender ideologies.” But here’s the meat of the report. The first statistics are referring to teen girls:
Nearly 1 in 3 (30%) seriously considered attempting suicide—up nearly 60% from a decade ago.
1 in 5 (18%) experienced sexual violence in the past year—up 20% since 2017, when CDC started monitoring this measure.
More than 1 in 10 (14%) had ever been forced to have sex—up 27% since 2019 and the first increase since CDC began monitoring this measure.
The report also found more than half (52%) of LGBQ+ students had recently experienced poor mental health and, concerningly, that more than 1 in 5 (22%) attempted suicide in the past year. Trend data are not available for students who identify as LGBQ+ due to changes in survey methods.
Findings by race and ethnicity also show high and worsening levels of persistent sadness or hopelessness across all racial and ethnic groups; and that reported suicide attempts increased among Black youth and White youth.
***
Let that sink in. What did you think? What did you feel? I am in tears.
My tears are not because I’m a parent of two beautiful newly-fledged children whose safety I fear for every day. They’re not because I’m a woman who knows from personal experience as well as any woman does that the increasing rate of sexual violence still only begins to touch the true horror of our lives as objects. My tears are not even because one of my children is female, and now attends frat parties. My tears are because this damned report says ‘LGBQ+’. My tears are because there is no T.
My tears are because, among the many children I’ve taught and known and loved over the years are a couple handfuls of trans kids, whose stories and hearts and lives matter. Because the rate of depression, suicide, and violence that looks alarming in this CDC report is much higher for trans kids than for anybody else, and it’s not documented, here. My tears are for Marlin, my beautiful trans cousin who struggled with extreme depression and finally killed himself just after Trump was elected, the first time.
And my tears are pointless. Just like hopes and prayers are pointless. All the billions of tears shed for the children we’ve lost will not save all the children we have yet to lose. Our tears are pointless. We have to act.
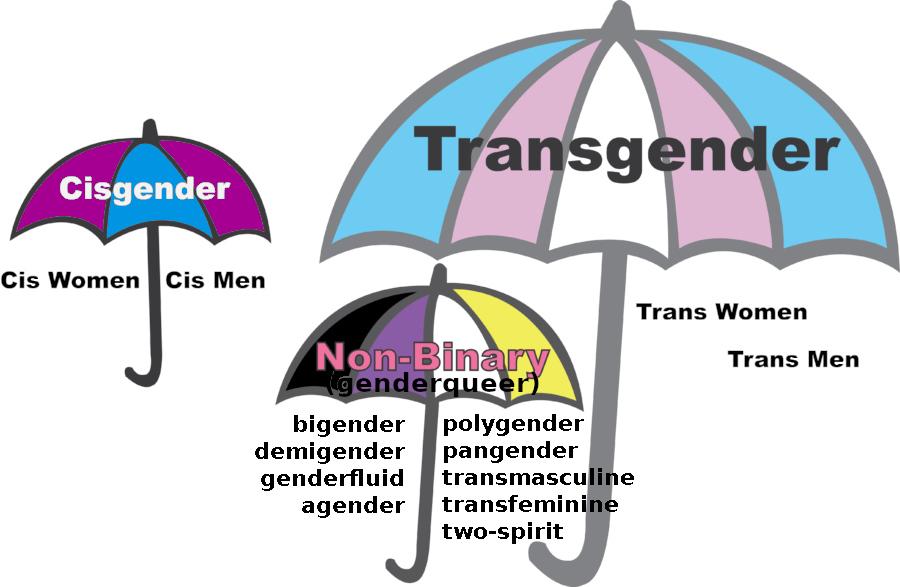
And what if we don’t know any trans kids? What if our kids are straight, cisgender*, white, wealthy and male? Why should we care? We should care because, in a world where it’s OK to erase people for being trans, it is also OK to erase people for being gay, disabled, non-white, female, or poor. And eventually to erase anyone, for looking different in any small way; for making a mistake or getting sick. And even if our kids are among the privileged few, that world is not a safe place to be. A safe world values everyone. Even the rich. Even trans kids. And besides, we don’t actually know how our kids identify, especially if we haven’t built a world where they feel safe enough to tell us. So what can we do to build this safe world?
My first act after the gut-kick of seeing trans children erased is to write this article. And I will never, ever shut up. I will write more and open my mouth more, and speak up against every ignorant human who tries to tell me they’re saving the children by persecuting trans kids (yeah this isn’t my first walk around the block, in this regard). I will keep wearing the ally pin my kids gave me a couple of years ago, not only because I’m so very proud that they see who I am, but mostly because I know that some frightened child might see the rainbow on my lapel and know that I care; that I will stick up for them, even when they don’t know about it. I wish I had known what Marlin was going through before he died. I wish I’d been able to help him. I wish millions of us had built a safe world for him to grow into, long before he changed his pronouns.
I’ve been asking myself since I was a teenager how I can support LGBTQ+ people in my community. Ever since a boy my age followed my friend and me home, nagging us—either of us—to date him. So I told him we were gay. It was a lie, and half-joking (I had NO idea at that point the severity of what LGBTQ+ people were experiencing.) I thought I could throw him off by making us unavailable to him. His response was, “well that’s a waste of two beautiful girls!” It stuck with me forever. I still think about it. The fact that we were unavailable to men made us a waste. Worthless. That response lit a fire under my butt that has never been extinguished.
It turned out my friend actually was gay, as was my other best friend at the time. And as the years went on, I discovered that more and more of the people I loved were treading the terrifying social swamp of being unavailable to straight cis white men. At around the same time, I found a porno magazine (in the possession of ten-year-old boys) with a photo-rich article about a man converting a lesbian by raping her. That lit another fire. Literally. I stole the magazine and burned it.
And then I had kids. And I had to protect them from the harms leering at them from every corner. And as the number of trans kids we knew grew and grew, and as my own kids educated me about gender and inclusivity, the fire under my butt grew and grew, too. And then we lost Marlin. And now he and every other trans kid I know has been erased. Now the fire is so big I’m a damned rocket. And what are you?
How are you going to protect your kids? How will you make sure they know that if they come home with a new girlfriend or boyfriend or non-binary partner you’ll be delighted, enthusiastic and welcoming? What about if they come home with a new name or pronouns? Will you learn what they know, and follow? Will you stand up for their rights when they decide to start hormone therapy? Will you wear the trans flag when you take them to the doctor?
We adults often think we’ve learned all the stuff. We think it’s up to us to teach the children, but it’s the other way around. We need them to show us how to use our phones, and we need them to teach us about gender and sexuality. Because they know. Yeah. Sexuality. Let go of your pearls. Our kids knew before we taught them the word ‘vagina’. Some of them were raped before that. We need them to teach us what they know, and we need to be open to hearing it. We also need to admit when we’re wrong.
A bunch of years ago, I was walking home with my young teenage daughter, and announced that I was so proud she was non-binary. I was also proud of myself for having recently learned this word.
“Um…” she faltered. “I’m not sure you know what that word means.”
I swallowed. “I thought it means you don’t see or stereotype people for their genders. Like it’s not all black and white. I’m proud that you see the diversity of people.”
“No, Mama.” She corrected me gently. “It means you don’t subscribe to gender binary.”
“Right? That’s sort of what I said, right?”
“No, like personally you don’t subscribe. For your identity. If I was non-binary, I wouldn’t consider myself male or female. I would probably use the pronouns they/them.” She walked on beside me like what she was explaining was just part of everyday knowledge, and I guess to her, it was. “I’m definitely female,” she said. “And Tali is definitely male. Even Marlin was definitely male. But if someone is non-binary they wouldn’t be either one. They’d be non-binary.”
At the mention of Marlin, the conversation became a lot less jovial. I was sorry I hadn’t understood, and I felt very small. Sad. Like suddenly maybe my misunderstanding presented a hazard to my daughter’s safety, even though she is cis. What else did I not understand? But she was forgiving, and understanding of my mistake. “Sorry, Mama,” she said.
“It’s OK.” I swallowed my shame and carried on. “So do you have any non-binary friends?” Out of respect for her friends’ privacy, she couldn’t tell me. And I was proud of that, too.
I’ve learned a lot. It turns out non-binary people can also identify as male or female. The gender umbrella is diverse!! And it’s OK to be confused. It’s a great place from which to build curiosity. My kids moved out a few years ago now, and are still my greatest teachers in many ways, especially where culture, inclusivity, and love are concerned.
graphic used and adapted with permission from Gayta Science
Love. Yes, there has to be a fire under our butt. And it has to be fuelled by love. Where the rise of fascism is tearing at the already-shredded fabric of our diverse society, we have to wipe away our tears and start building, with love.
How do we build a safe and inclusive society? We have to swallow our fear and pride and shame and speak up at every opportunity, to wear the colours that show we’re safe adults, to teach other adults what our children teach us, and mostly we have to listen with open arms and open hearts, because many of our children are light-years ahead of us in doing this work. The answer is openness and curiosity.
What I think this all comes down to is that as people with a certain amount of privilege, and sometimes very little understanding of the LGBTQ+ world, we cis parents can still be part of the solution. We can look at the children we love with curiosity and respect. We can amplify their voices and knowledge and build the world they envision. And we can see and support the many safe spaces that empowered LGBTQ+ people are building, already. Because they are powerful. We are powerful. And when our power comes from love, we are all empowered, together.
My cousin Starry, Marlin’s mother, has been a guiding light for me, in my efforts to expand my mind, following the loss of Marlin. When he died, most of us in the family didn’t even know he was ‘he’, or calling himself Marlin. We hadn’t built the kind of safe space in our relationship that he needed to be himself, with us. It was Starry who informed me who he was, despite her pain. Starry, as you might imagine, suffered deeply with the loss of her child. And as the years have gone by, she not only received support in her loss from trans youth, but has also intentionally made herself and her presence a safe space for LGBTQ+ people. She continuously educates herself, and has three trans “foster daughters”, now. Loving others doesn’t only help those we love, it helps us too. Love is always the answer.
So let’s go. It’s Pride season, but it should always be Pride season. Let’s stoke our fires and make sure we’re building and supporting safe spaces, with love.
***
My own children, as well as Marlin’s surviving family members gave their consent to my mentioning of them, in this article. Consent-seeking is part of building safe spaces. I’m grateful for advice and feedback on the article from my own children, and Starry’s friends. Listening and hearing others’ opinions is part of building safe spaces.
Definitions, Links
*The word cisgender (often shortened to cis; sometimes cissexual) describes a person whose gender identity corresponds to their sex assigned at birth, i.e., someone who is not transgender. (Wikipedia: https://en.wikipedia.org/wiki/Cisgender)
A transgender (often shortened to trans) person has a gender identity different from that typically associated with the sex they were assigned at birth. (Wikipedia: https://en.wikipedia.org/wiki/Transgender)
Non-binary or genderqueer gender identities are those that are outside the male/female gender binary. Non-binary identities often fall under the transgender umbrella since non-binary people typically identify with a gender that is different from the sex assigned to them at birth, although some non-binary people do not consider themselves transgender. (Wikipedia: https://en.wikipedia.org/wiki/Non-binary) AKA: gender non-conforming.
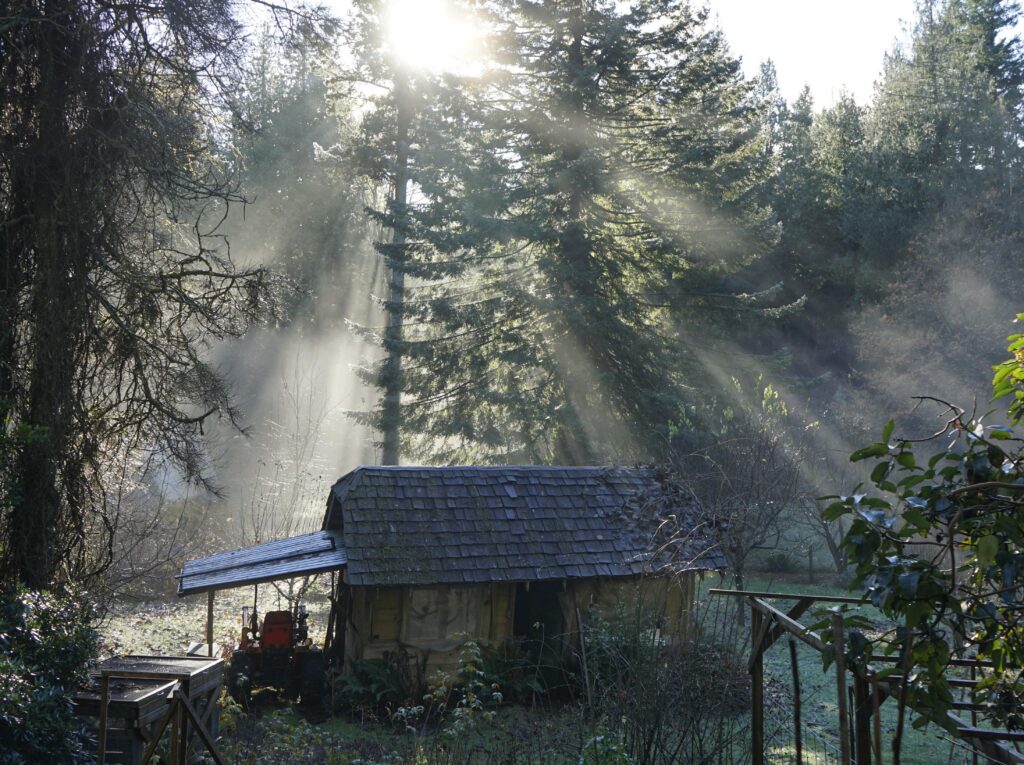
Pappa built this shed in 1983, when I was seven. With his confident hands he cut the trees on this land, bucked them up, and built a whole life for us, this building being one of the first big things. He used logs for a foundation, and built a frame of scrap wood and home-milled beams and planks. He used a simple froe to cut hundreds of cedar shakes for the roof, and when he was finished he installed the headboard from my brother’s bunk-bed as a ship’s wheel at the end of the hayloft, and he added a little electric propeller to the front door, so we could pretend we were flying a plane.
My brother and I and all our friends slept many nights in the hayloft, convinced there weren’t any spiders, by night, even though by day the palm-sized wolf spiders crouched between many of the shakes over our heads. We could sleep with our heads by the steering wheel and watch the stars run by.
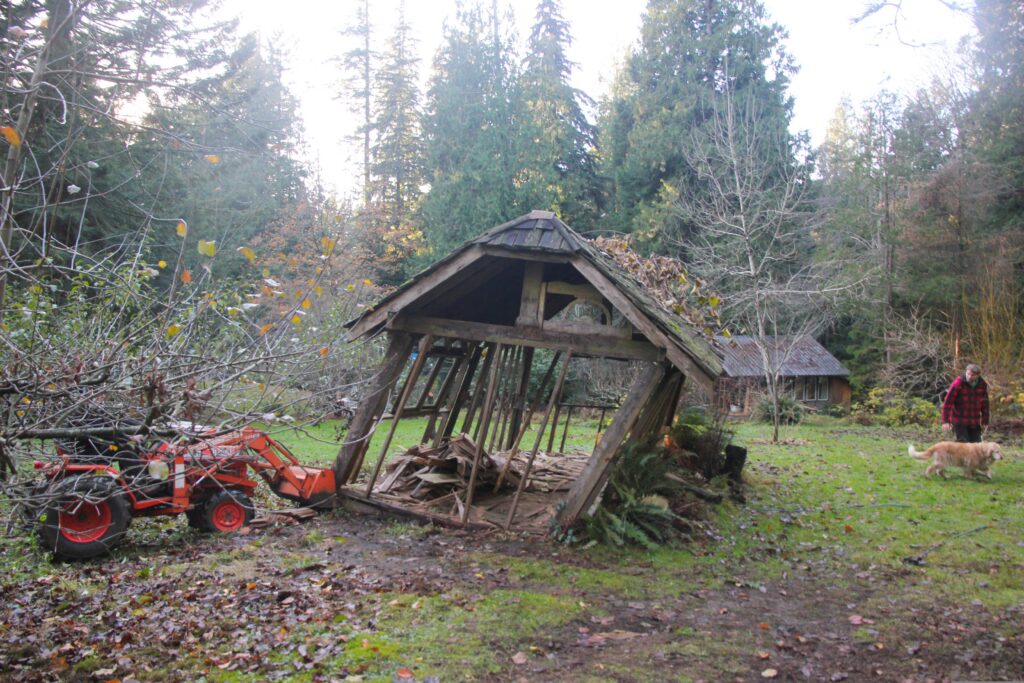
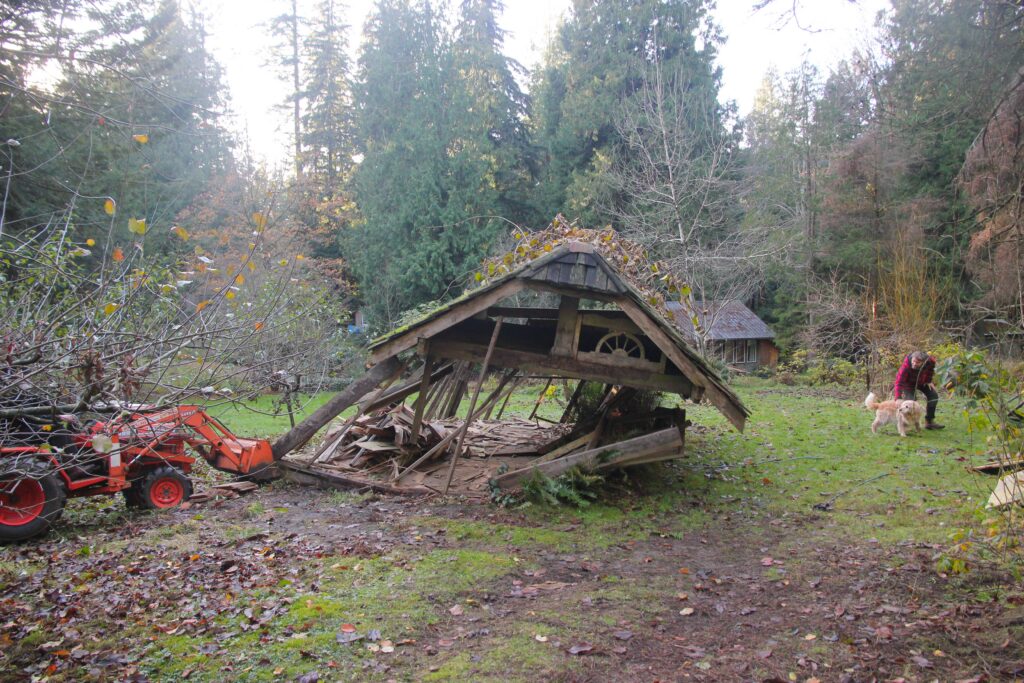
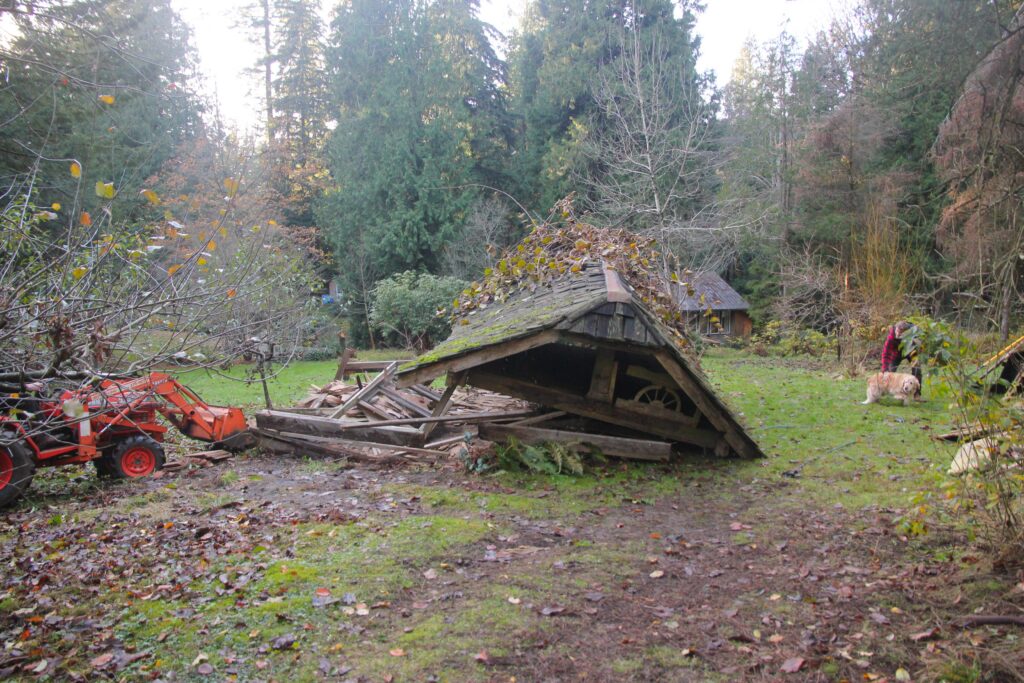
This is the shed where we slaughtered rabbits, raised chickens, hosted haunted houses and tea parties, and eventually made some carpentry projects. It’s the shed my own children think of as the steam train, for the way its roof steams in the winter chill. And after forty-one years, its life is over. The logs that support its sturdy plank-floor have rotted away, and the shed is listing dangerously.
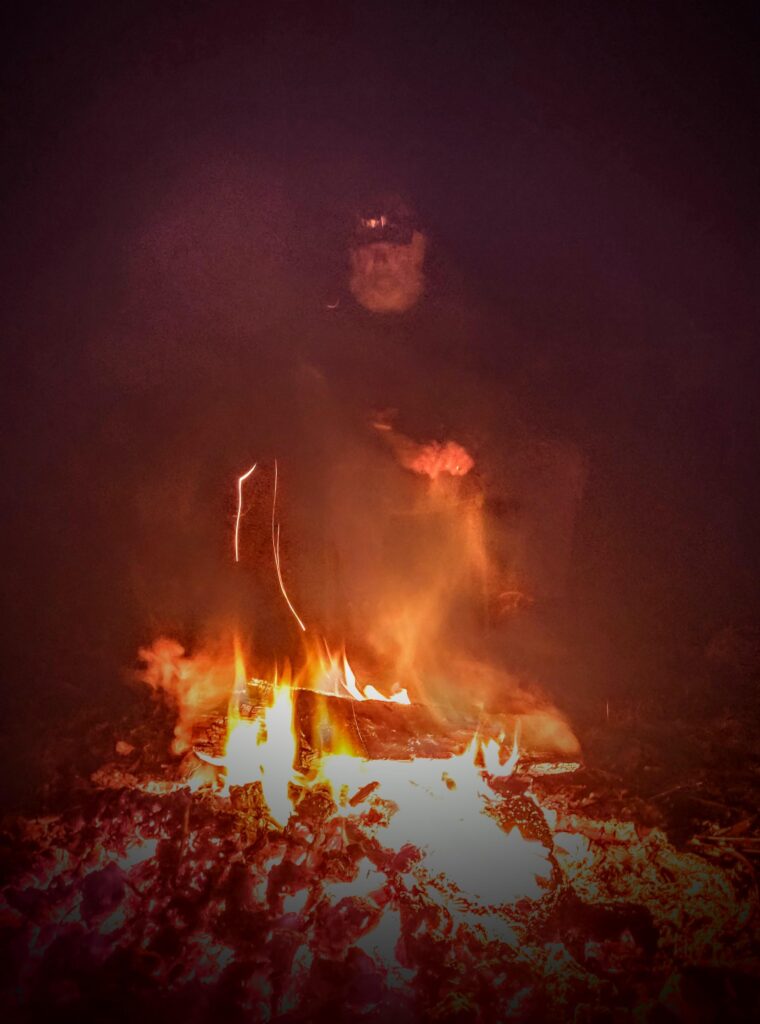
So this weekend, after slowly emptying it of two generations’ worth of tools and other “useful things”, Pappa pushed it over with his tractor.
It’s hard to see it go, in a year that already gutted our family, but in a way, this evening’s hot dog roast over the flaming pieces of the shed was a kind of letting go. Maybe fire leaves devastation in its wake. Maybe it takes and takes ravenously. But it also cleans.
I feel a bit like I was washed by the flames, tonight. I wonder if that’s how my mother’s flesh and bone felt, as it was burning up in the crematorium. Now she’s become the heat that rose up into that spectacular sunset on the night she burned, and her bones, the tiniest white fragments—molecules mixing with the humus and mineral earth. I hope she feels clean, now. Things look different around her without the shed.
When people talk about severely traumatic events, they often refer to "The Before Times". I heard this during Covid, when we could look back at carefree parties and hugs with our grandparents. I felt this when my father died, and his half of my family crumbled, and I remembered all the beautiful times we'd spent together, not knowing they were our last.
The Before Times are always somehow fanciful. All the negativity disappears and we pine for those Before Times like unrequited dreams. We long for and resent our lost innocence. Before I had Long Covid, I could just walk around on the streets and up the mountains and down into the valleys. In the After Times of Long Covid, I sat in my car and watched people walk by on the sidewalk, wondering how they did it. Walking seems miraculous, now. Those times when I could just call my Dad up to tell him about my day seem like magical memories. Those times when our children played together in the blissful company of grandparents who are now gone seem miraculous, now–now that we're in the After Times, where we are jaded and distrustful and fearful. We're in the After Times, where we are wiser. Supposedly. Wisdom, too, is not what we thought it was, when we were innocent.
I'm still waiting to feel wiser about my mother's death. I know I'm in the After Times, now, but I've just stepped over the threshold and I'm totally lost. People keep offering me pieces of wisdom, and every time I think, "Ah-ha! That's something that can help me on my journey!" And I stick the wisdom into my little threadbare bag of emotional tricks to pull out when it will inevitably be required on my Big Adventure Into the After Times. Like: "It's OK to cry; that means you're connecting with your mother," and "Mourning is a sickness. Like Long Covid. You've learned to integrate and adapt to that sickness; you can do it again." And every time these words feel like they came directly from the Deep Dark Mystical Universe of the After Times, where people are wiser and all the ones who've lost their mothers were apparently waiting around to catch my fall, and pull me into their embrace. Thank you.
Mum's little purse with her handkerchief.
And those pieces of wisdom hang out of my little threadbare bag of tricks; their invisible heavy tendrils dragging on the ground as I wander along. This is my bag, now. It was my mother's very fancy purse when I was small. She kept her handkerchief in it, and a thin Lancôme lipstick, and a smaller, matching purse for money. It carries the Memories That Kept Little Me Safe, when it was hers, and not mine, and I didn't understand this little bag. Now it's mine, in the After Times, and I'm filling it with the Advices of the Wise Ones.
One of the things I couldn't have known in the Before Times is the value of tears. I remember my mother's tears hitting this bag, inconceivably, as she reached in to get her lipstick, because they sometimes fell when nothing seemed to be the matter at all. And I remember them hitting this little bag; how it darkened with the damp, and how my mother swore at her own tears. Now I see the tears in the eyes of these Wise Ones; the weight and vulnerability and frankness of being The Ones Who Held Everything Together in the Before Times, but then the tether broke.
Now we're floating. Lost. Nothing is together and we are free like we never wanted to be. We have tears falling when nothing seemed to be the matter at all, but their dampness leaves stains that are inconceivable to those who haven't yet arrived in the After Times. Now I'm one of these Wise Ones and these tears are my welcome mat. And my wisdom-offerers are crying, because even after all the years of living in the After Times, the sorrow is not less. It's just integrated. And it's good to know someone understands. Accepts my tears. Our mothers are gone.
The sorrow doesn't get less. It just gets integrated. That was one of the mystical advices offered to me in the Before Times, but I didn't understand it. I just added it my little threadbare bag of advices, where it sat unused on my mother's shelf, in the times when I didn't know what that bag was for; nor how to use it or what it meant, or even how it was possible at all. People gave me this advice and I couldn't see it, because I was in the Before Times. We can't fathom what we have never seen. So my bag sat on a shelf in my mother's house, quietly, being hers.
But now I'm here in the After Times. My beautiful Mama was wiped off the earth so that everything that was so real and tangible before feels now like a cruel slap in the face; a memory of wonder and longing: her arms around me; her little red purse and strange assortment of French lipsticks; her mystical explanation that soon it will be my turn to understand; her tears telling me goodbye; her voice and her song and her love. Now I'm the wise one because I live in the After Times, with my sisters and my aunties and even my dead mother. Now I'm the wise one because I have the experience none of us ever wanted to have.
Now I meet the people whose mothers are aging; dying maybe slowly or imminently or in some far-off unknown and terrifying future, and suddenly they look to me like I'm a keeper of this horrible wisdom. But I look away from their searching gaze and into my Little Threadbare Bag of Advices From the Wise Ones of the After Times, and I wonder if I'm supposed to dispense these now, or wait. The answer is wait. These people who have not yet lost their mothers are still living in that blissful and mystical Before Time, and none of the Advices will help them because they don't yet know the horror.
This Bag of After Times Advices is like a set of unlabelled keys to a house of horrors. You can't know which keys fit which doors because you can't yet see the doors. We can't fathom what we've never seen.
Don't think you need to be prepared. You can't look over the threshold. You will have to reach the After Times, eventually. But not now.
Right now, you still live in the Before Times. Do that, instead. Live those Before Times like they are your last. Because they are; all of them are. Live them with your children and your parents and your friends and the lost ones and the found ones. Because one day you will look back and say "Why did I waste those Before Times not knowing how magical and mystically beautiful they were?!" And you'll put that too into your own Little Bag of After Times Advices, and you will look at those who haven't crossed over yet, and understand that nobody can give advice to the uninitiated, because we can't fathom what we've never seen.
Anyway, it doesn't matter how much you treasure your Before Times, it will never be enough. The more you love, the more you lose, but the losing is a kind of sublime sorrow that means you loved. So love. Just love.
I went out to see the auroras last night, and I cried. And it was beautiful, and I cried. I had to force myself to leave the house, because my grief feels like a prison, sometimes, but I went anyway. It was the first time ever I saw the aurora dance, and I was heartbroken not to be sharing it with my mother, so I told myself she was everywhere. In the auroras. That's one of the Advices From My Little Bag. Then I met another person on this horrible beautiful threshold of the After Times, and I did not open my Little Bag of Advices. We just cried. And in the dancing lights, I saw her tears.
A Universe Inside Me, a change/able painting by Emily van Lidth de Jeude To view this piece in action, see my MakerTube video.
All my life I've been interested in change-making. Other than loving my family, there's nothing in the world more important to me. But that's the issue–change-making costs money, and time that means I can't make money. My partner and I are constantly making choices to deny our kids some of the things their friends consider essential (travel, city-living, new devices, new shoes, a better car, and so many extra-curricular programs), in exchange for working on projects that we hope will better the world or just our own future. And yet, here we are with young adults on the verge of fleeing the nest, walking straight into the same capitalist trap they were raised in. And we're thinking of how to support their new city life while the world falls down around them.
Cognitive dissidence is the least of it. I'm sitting here in the bizarrely unsurprising October heat and drought, the other side of our yard obscured by smoke, and really just wondering what comes next.
In my work-life, I'm producing installations intended to bring people into connection with the ecosystems they live in, and with each other. I do commissioned portraits on the side, just to add a little tiny cash-flow to our family, but I've chosen a career that costs more money than it makes. I'm proud of this choice, but the balance is that my partner makes the family-sustaining income by creating software that, among other things, is used by companies logging old-growth forests around us, destroying the ecosystems I'm trying to save.
At home, we're trying to grow our own food, which has turned out to be a very good thing, now that inflation is hitting us so hard. But we're buying plastic bags to store chickens in, and the climate is so unpredictable we're constantly re-planting, or nurturing struggling plants for months that ultimately fail to produce crops. No learning-curve can keep up with the speed of climate change. So we keep ending up in the stores with everyone else, trying to meet our nutritional needs as cheaply as possible, while wasting endless dollars buying chips and treats made by corporate behemoths that we feel will keep our kids happy. So we can send them smiling into the future.
In our community we're traipsing around making improvements while our friends drop like flies around us. We're afraid to ask for help when we need it because we know everyone else is already beat up by their own struggles, so we isolate and feed our lonely pain with all the subscriptions and addictions we can. And we contemplate the struggle: How can we make enough money to feed our kids without destroying their future? How can we raise them happy in a world where nothing matters more than the capitalist quest, but safeguard them against a capitalist apocalypse? How can we output joy when there's only fear coming in?
I wish this was a post where I have all the answers. Sometimes I try to write posts like that, and at those times it feels like there's a possibility we can plan and manage our way out of this mess. Right now I just sink into a futile wish that we'd all just stay home and forget the dreams we were sold as children, as impossible as that seems. I wish we'd stop selling the same dreams to our own kids at the cost of even the meagrest subsistence in their future. I wish we would all just grow food in peace, love each other and what remains of the world outside our doors.
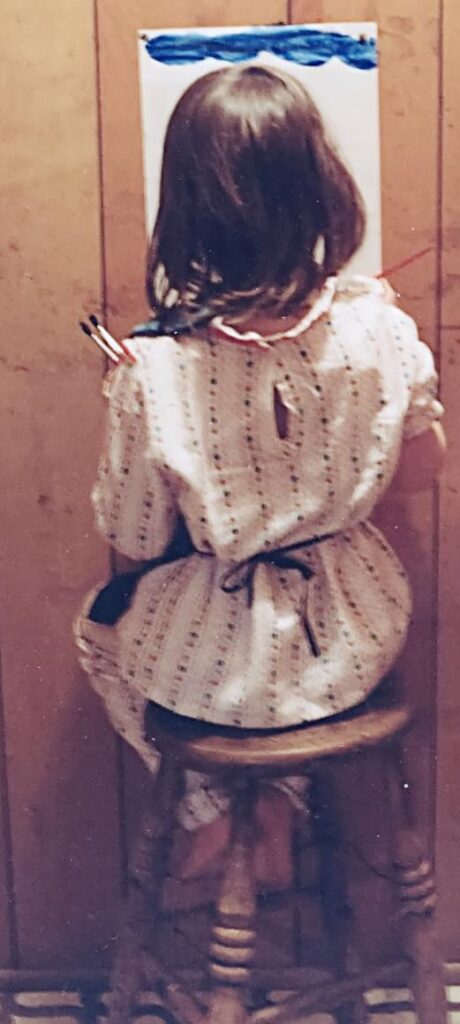
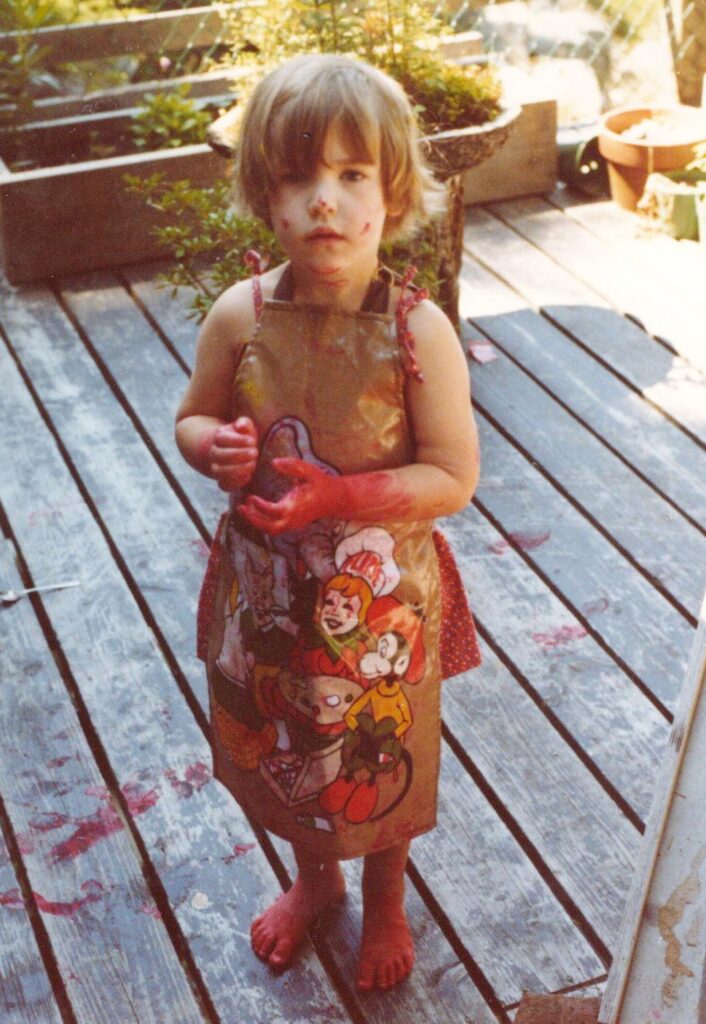
When I was a kid, I wanted to be an artist. Or a botanist, or a hair-dresser. My parents and grandparents gave me wonderful art supplies, and my father even made me a palette with a hole in it for my thumb, and positioned the kitchen stool in front of the wall of our trailer for me to use as a painting stool. That’s me in the photo, in the early nineteen-eighties, feeling wonderful and accomplished, but with absolutely no idea of what it meant to “be an artist”.
So What, Exactly, Is an Artist?
I'm an artist, now. Twenty-five years and two kids after I got my degree in visual arts, my career is built on helping people reach beyond societal expectations to un-silence themselves, and connect genuinely with the world we inhabit. I do paint, and I do have gallery exhibitions, but I also tromp in the forests, use materials I never imagined would one day be called “materials”, and make art I never imagined would be called “art.” The focus of my work is to connect people with our own deeply-held stories; as an explorative learning consultant I also encourage parents and teachers to do the same with their children. It turns out art was just a vehicle for something more important to me. And I’m still an artist.
The stereotype of the famous artist making masterpieces in his (he's almost always male, white and powerful) studio has almost nothing to do with a successful art career. I wish somebody had explained this to me when I was a kid. Picasso was an abusive, deceitful creep, and we don't have to appreciate his work to be artists. There’s SO much more wonderfulness in being an artist than I had imagined! So much more diversity!
Artists are responsible for not only the beauty we see in our human-made world, but also for the connection we make with neighbours, for the realizations we make about our own lives and feelings when we watch movies, listen to music, or read books. Artists determine how easy it is to use the devices we buy. Through media, artists determine which devices and foods and colours will be more popular. They understand the influence of shapes, colours, sound, movement and texture on our emotions, and… like it or not, our emotions govern much of what we do. Artists are powerful. A “career in the arts” is a massively open-ended term, but also, having a grounding in artistic practice and theory means a deeper foundation or influence in any career we choose. Moreover, having the ability to express ourselves is an important foundation of meaningful connection.
I like to imagine a world full of people who were encouraged in this way. How happy, satisfied, and valuable could we all be? How would our chosen paths be enhanced by a facility with self-expression and material, sound, or movement exploration? Do you really want your kid to be an artist? And if so, how can you support them?
What NOT to do: Unsolicited "Help"
It's incredibly easy to break kids' confidence in art (or anything) and less easy to build it. As with so much in life, the first thing we can do to "help" our kids succeed is to get out of their way. It's not easy, especially when we're watching them struggle with something we know there's an easy solution for. But we zip our mouths, find something else to occupy our attention, and trust that they'll get where they need to go. And never, ever critique.
Criticism is more likely to break our confidence than to teach us something, and a shattered confidence is a massive barrier to success. My daughter is a writer, and was recently working on her second novel. I edited her first novel for her, judiciously reporting back on only glaring typos and missing punctuation. It was an amazing realistic fiction coming-of-age story, written from the bold heart of a young girl whose grandfather had recently died. I love it so much I heartily recommend it to readers of all ages. Her next novel, though, was a departure from the world she knew and understood so well, and required a steep learning curve. It was an epic fantasy, full of people from different cultures and a massively complex magical world… all of which she dutifully researched and developed before writing. But then she was challenged by trying to fit this enormous complexity into a single story. And when it came time for me to edit her book, I didn't hold back with the criticisms and suggestions. Some chapters were confusing, some events seemed out of place, and mostly I was confused by the timeline. Sure, she was only fourteen, but I just knew she was capable, so I critiqued! Despite my attempts at being gentle with my criticism, it all seemed insurmountable to her, and after a few attempts at editing, she abandoned the book. To her credit, she's keeping an open mind about the possibility of writing it in the future, but unfortunately I feel I threw a hammer at a beautiful glass sculpture she was creating, that actually she just needed more time with, alone. Without my critiquing.
So that's how not to build confidence. Just think of all the ways we're doing that, in every part of our kids' lives, and even our own. So many of us have an overachieving inner critic. And a culturally-supported fear that that critic is what's keeping us on the straight-and-narrow. But you know what? It's not. What would happen if we just didn't correct our kids? Well I have some experience with that, now, both in teaching and parenting. It's ridiculously hard to shut up my inner critic sometimes, but when I do, the kids thrive.
My daughter is truly an excellent writer–so much so, that in her frantic enthusiasm she charges ahead, forgetting to put periods at the ends of sentences, capitals on names, or sometimes misspelling words. She edits herself, and (as we all are prone to doing) sees right through her mistakes to read what she intended to write. What if she asks me to edit and I just ignore those mistakes? I've experimented with that. Sometimes she looks over her work later and discovers her mistakes. Sometimes she puts it aside for a few months, grows and learns, and comes back to it to realize she would now write it differently. Sometimes, even, she submits or publishes something with mistakes. And you know what? That's just fine! I frequently go back to my own work from years earlier, and see how much I've learned and grown since my thirties–and yet my work was appreciated then, as well. Have you any idea how many typos I still find in my writing? Tons. I'm especially accomplished at missing words and totally redundant examples. Sometimes I don't even bother to correct them. Because they're part of my humanity. Our kids deserve that space to be human, too.
Honouring Growth
As a visual artist, I love to look back and see all my mistakes. I look at portraits I painted years ago, and wonder why I did them the way I did; sometimes I also notice things I thought were problems at the time, that now inform new directions in my work. Growth is where it's at, people! Otherwise what are we living for? In some deep place, children know this, as from the moment they're born they challenge themselves to grow by exploring different tastes, movements, and expressions.
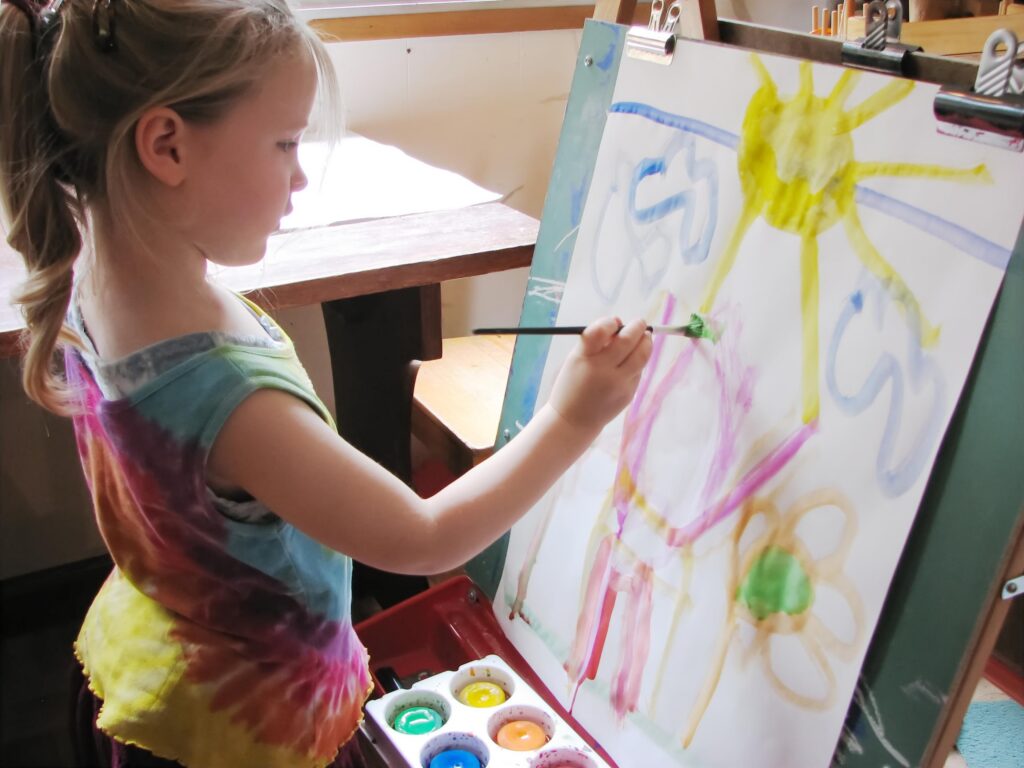
Rhiannon, age 5, experimenting with paints.
Children, like my daughter in the photo, above, want to represent their world. But it isn't always as we might expect! As parents, we have a choice about whether to show our children how to draw things the way we think it should be done, or to allow them to discover their own ways, through experimentation. My son was once drawing a whole page full of lines, and I asked him what he was drawing (something I've since learned not to do), and he told me it was a drum. I was totally perplexed, and asked him where the parts of the drum were. This was a boy who had no problem drawing a circle–why would he choose to represent a drum with a whole lot of unconnected lines? "It's the sound of the drum." He said. Boom.
He didn't need my assumptions. He needed my appreciation, and the freedom to keep exploring. As long as we respond to our kids' experiments with curiosity and loving encouragement, they'll continue to know that where they are on their journey of growth is perfect. And that will be the impetus they need to keep growing with enthusiasm. I have no idea how my son's drawings of sound influenced his life, but considering he now is employed as a visual artist and makes music to accompany his personal visual projects, I'm relieved I didn't get in the way of that particular growth pattern by showing him "how to draw a drum."
Asking Helpful Questions
I realized during my children's earliest years that questions like "what are you drawing?" are extremely limiting. In that question I have determined that my child must be trying to represent a specific thing, and the assumption is usually that it's a visual representation of something we know. But what if it's not? What if it's our children's experimentation with colours, shapes or lines? Or sound, as in the drum example? That kind of experimentation–without intent to satisfy outside demands–is essential for learning to use materials. Professional artists actually bill for material experimentation; it's called "research". We even sometimes mount gallery exhibitions composed entirely of experimental output–often to great acclaim. So why would I limit the possibilities of my own child's artistic output?
But we want to ask questions! We know it's important to engage and encourage! So how can we ask questions that promote growth-dialogue about art (or anything), without limiting our children's growth or expression?
Think about the words in the question "What are you drawing?" The word 'what' carries the assumption they're trying to represent an object. The word 'drawing' means we assume they're focused on the output of the material in their hands, as opposed to the feeling, taste, smell, or movement of it. How are these assumptions limiting the range of acceptable answers?
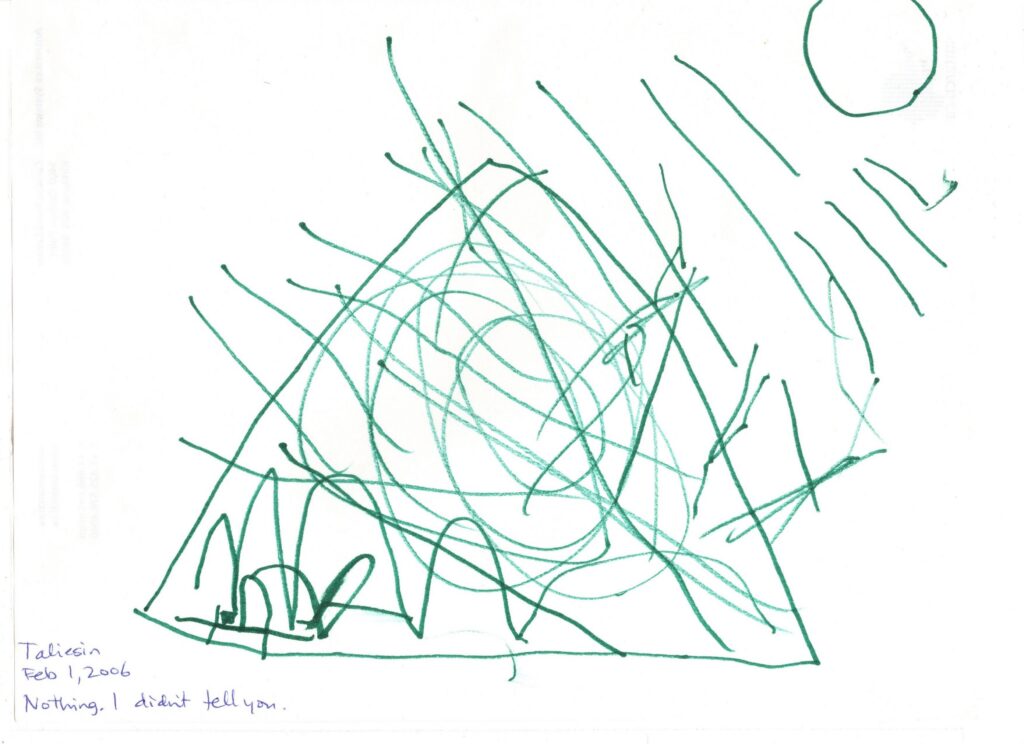
Drawing by Taliesin, age 3.
Maybe we have a kid who is happy to contradict us, and says, "I'm not drawing anything. I'm dancing the pen," or, as in my son’s drawing, above, “Nothing. I didn’t tell you.” (I learned a lot about parenting from that bold rejection.) But more likely, our kid wants to please us; to learn from our example, and will find a suitable answer, like, "some lines," or as my daughter used to do, look at a bunch of lines she was experimenting with and come up with a wild explanation like, "it's a dog on a house with the family having dinner." It's tragically very common that kids learn to minimize themselves to match what they perceive coming from adults. I've seen plenty of kids who were making successful attempts at depicting what might have been people or animals declare that they were “just scribbling.” Why? Because maybe they feared hearing our criticisms, or maybe we've previously defined their drawings of animals as 'scribbling', or maybe, because their own inner critic is already developed enough to silence their voice.
Adults are notoriously bad at asking kids questions, and kids generally have rote answers ready to respond to each of them: How old are you? How is school? What are you making? What is your favourite colour/subject/sport/etc.? How are we so uninspired?! These questions aren't about engaging with kids or developing rapport; they're expected. What if, instead of asking what they're drawing, we invite them to tell about what they're doing? This is an open invitation to consider what they're doing and talk about it. It's up to us to be open to hearing their response, no matter how long, unexpected, or confusing it may be. Not all questions will be helpful for all kids in all situations, but through practice we can become better at asking good questions. Here's a list of interesting open-ended questions to use in engaging kids to talk about their art:
Interesting! Can you tell me about this?
Does this have a story or feeling?
How do you feel about what you're doing?
Show me how you like to use [material]…
What do you think about the materials you're using?
Are there any other materials you'd like to use?
Materials
Ah how I love shopping for materials!! And hoarding them!! Don't we all?! How much of our parenting waste is comprised of once-used adorable kits that were soon replaced by something newer and more exciting? I won't go on at length about this, because I've previously written a whole article about Supplies and Practice of Open-Ended Art Exploration. But suffice it to say that well-chosen art materials are the foundation of good artistic experience. And I don't mean the expensive stuff. I mean well-chosen. Materials can be anything from kitchen supplies to mud and sticks outside, to a mish-mash of mark-making, gluing, cutting and melting tools. The important feature of all of these things is that they do not come with instructions or intended uses. How we present and use materials is much more important than what they are.
Modelling
From the moment they were born, and possibly earlier, our kids have looked to us to lead them. The important thing to remember about modelling to our children is that it's happening all the time; not just when we do it intentionally. Our kids see our hesitation and fear with art as much as they see our enthusiasm. They see us avoid trying new things, and they see us when we courageously do them, and when we have small successes and failures. They emulate not only our actions but also the way we emotionally deal with these things.
With this in mind, the absolute best thing we can do for our children is to use any and all materials available to us to explore creatively, for our own happiness. That last bit is important. Kids can smell a fraud from a mile away, so we have to be creative in the way that we want to be. Otherwise we're just teaching our kids to put on a show for someone else's benefit, and that's nothing about authenticity.
And we should stretch ourselves. If we're accustomed to buying craft kits and following the instructions, we should absolutely try to break that habit (more on why in the materials article, above) and try experimenting with new materials. We can also stretch our definition of art-making. Try experimental baking! Try sewing or crocheting! Try putting on your favourite music, getting dressed up in fancy dress or costumes and dancing your heart out! Try painting your whole self and rolling around on an old sheet, outside. In the rain! It doesn't matter what or how you engage in art, just as long as you do it. And if your output isn't what you expect? Even better. Keep experimenting. You're modelling growth to your children.
Living a life full of joyful exploration and learning, ourselves, is the best way we can teach our children.
Nurturing Important Skills
Me, age 4, being an artist.
We’re culturally trained to associate specific skills and attributes with art: dancers should be thin and flexible, visual artists should be able to draw realistic depictions with technical skills like shading, perspective, and colour theory; musicians should first learn to read music and do scales. Unless we’re born talented, of course.
Oh hell, I hate the word ‘talent’! It's such a harmful concept. I wasn't born talented; I developed some skills in accurate rendering of my observations by having a keen interest in observing how things are put together; how the light plays on them, and being given room to experiment with materials throughout my life. It was easy for me because I loved it, just like my daughter loves telling stories, so writing is easy for her to learn. We develop the skills we need when we realize we need them, and as long as we're not discouraged from exploring them.
As parents and teachers, we need to help build foundational skills for life, and trust that those material skills will come when needed. As an artist, I owe a huge amount of my career satisfaction to some less-concrete skills and passions:
seeing the big picture in life, art, etc.
a keen interest in social phenomena
a passion for exploration and discovery
We really can't know what skills will be foundational for each of the unique kids we work with. Neither can we know the cultural landscape our kids will grow into, nor what careers will be common, when they’re grown. Who knew, when I was in art school twenty-five years ago that people would be making virtual and even invisible art to sell online, one day? Who knew I’d raise a son who gets paid to make thousands of geographically plausible planet renderings by using procedural generation techniques? His art process looks like a bunch of visual programming. I could never have predicted this, never mind taught him these skills. So when trying to support kids I parent and teach, I try to encourage growth of all sorts of skills. Life is not divided by subject. Careers are not determined by skill-acquisition. It's all interconnected. The more we learn, the more we can learn.
So Do You? Really?
Yes. I guess I really do want my kids to be artists–however that looks for them, and however it looks in the future we can only dream of. I want them to explore all the materials and develop all the skills I can’t even fathom right now. I want them to change the definition of the word “artist” to mean new and wonderful things, and I want them to keep on growing as the world grows, around them.
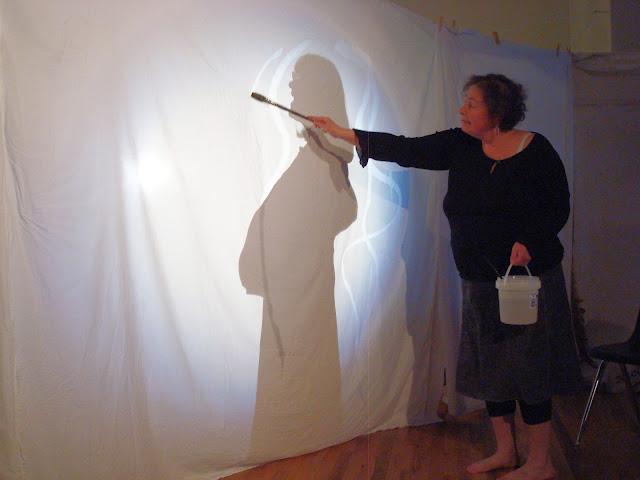
Visual and film artist Lidia Patriasz paints the silhouette of my mother, Lyn van Lidth de Jeude, during a performance of my work, SuperMAMA, 2010. All the women who participated in this production were mothers; most were also visual artists or musicians, and these two were also preschool teachers. Photo by Adrian van Lidth de Jeude.
As a teen, I never really thought about becoming a mother. Finding the elusive “true love” — yes! But not kids. I was going to find a man who was supportive of my political views (and would understand there is nothing actually “political” about equal rights), and spend my life busting up the patriarchy with gusto! Through the amazing art career I had planned, I was going to save us from climate change AND our degrading societal norms, by showing the world what absolute tools for the patriarchy we’ve been, and getting us out from under the shoe of the Man. Yeah.
So… that didn’t go quite as planned. My man was not unsupportive, he was just mild-mannered and uninterested in the big angry mission I was on. But he loved me. And also: hormones. Somehow my hormones side-swiped my passionate goals, so that suddenly, and for a few years, there was nothing more important to me than having babies. (My teenaged self gets whiplash here: HUH?!) So I had my baby, and determined when he was nearly two that it was time to go back to my career… or have another baby. I chose that latter. The timing of this choice coincided with our first child’s registration for preschool.
Preschool is such a wonderful thing! These devoted people take our kids so we can go back to the work of tearing down the patriarchy! My mother in law tells of the glorious day she left both children at preschool, and walked away with her body upright for the first time in years! It’s the place you go to drop off your beloveds for a beautiful day of mind-building play and learning, and you — the newly freed mother — go back to your world-changing career!! YES!! (I was SO naive.)
In my case, the first two years of preschool were spent back and forth between nursing my youngest and tending to the eldest while he very slowly acclimated to a system that never worked for him: school. I said he acclimated. He never thrived. By the time my youngest entered preschool (where she absolutely did thrive), my job became accompanying my eldest to his Kindergarten, where he continued not to thrive.
It wasn’t a heartfelt thinking-through that led me to leave my career behind. It was just circumstance. I could never have left my son in that world that wasn’t serving him, and homeschool (unschooling, in our case), seemed like the best option. Nobody picks the second best option for their kids if they can help it. My husband and I rarely even talked about our life as a choice, and when we did, it was only that I apologized for not making any money, and that he reassured me my work with the children was equally important. I had found the equality I’d been fighting for: not in equal pay, but in being equally valued — at least by my partner.
Financially, staying home with my kids was certainly a sacrifice. On one income for the foreseeable future, we abandoned our dreams of owning our own home. We are incredibly lucky in being able to rent from my parents, which has meant we have a kind of home security unavailable to most renters, today. But it was a mouldy and rotten home, and has necessitated over a decade of my husband’s free weekends and vacation time spent rebuilding (he’s still not finished, actually). So we sacrificed free family time, as well. Of course all this meant that unlike many of our kids’ friends’ families, we rarely had money for vacations, new clothes, or sports and arts programs.
What we do have is an amazing attachment. That alone, and the benefits I knew it would have for my children’s lives, was enough to keep me home. It was enough to make every sacrifice of money, freedom, and career worthwhile. And I was so passionate about my work as a mother that it really became my life. I volunteered at various family-related organizations, served on and chaired various boards in my community, and founded and ran a few programs, all geared towards supporting healthy families in our community. I somehow never even saw the irony of becoming a stay-at-home-mom, after my passionately feminist youth, until people began pointing it out to me, as my kids grew older, and I continued staying home. It seems it’s reasonable for a feminist to have kids and attachment parent them, but then apparently one should put them in school and get back to work on smashing the patriarchy.
Well hold on! What if my work as a mother IS smashing the patriarchy?! Is feminism now relegated to single, childless women, or those who leave their kids in the care of others? What does that say about our respect for other women? Day-care workers and teachers are some of the forgotten sacrifices in this equation, disrespected in wages, benefits AND the mainstream feminist viewpoint. Like stay-at-home-mothers, they’re the people feminism blindly relies on to raise the next generation of feminists, while feminists are out doing “more important” things.
In the process of changing the world, there is NOTHING more powerful than raising children.
The way we raise our children determines how successful each generation of women will be at improving our lot. When caregivers aren’t valued as much as our economy values shareholders and industry-builders, we all lose. That goes for daycare staff, teachers, AND stay-at-home-mothers and homeschooling parents. Many stay-at-home-mothers are the volunteers in our communities who make the programs that support women and children.
And all that is not to ignore the unbelievable power of setting an example. As parents, we are the greatest teachers our children will ever have. When they’re sixty they’ll find themselves blindly doing what they saw us doing. There is no such thing as “do what I say, not what I do”… our children will always do what we do. So when they see us living powerful lives, when they see our partners respect us; when they see us respect ourselves, they will follow suit. And if we take in other children to care for, we’re influencing those children, too, and their children’s children. In everything from the choices we make in life, to the ways we speak to our children to the ways we glance at ourselves in the mirror, in passing, caregivers are POWERFUL. We’re the grease in the wheels of feminism. I argue, actually, that women who put down other women for choosing to stay home with children are just part of the blind patriarchy.
Without regular vacations, without owning a home, without being socially acceptable, I am privileged. I’m privileged to have watched my kids grow up; to have shared my own life with them, and to have grown alongside them. I’m privileged to have had opportunity to make a difference in my community, and to model that for my children, so that, as young adults, they’re now busy doing the same. I’m privileged to have developed a very close relationship with my kids.
The experience I’ve had in staying home with my kids and unschooling them is not available to all women: especially not to single mothers, or those with partners who are not supportive of the idea. Even as I now struggle to develop a career as a middle-aged woman with disability and not much documented work experience, I know how lucky I am to have lived the life I chose. My career has shifted from some-kind-of-subversive-artist to an artist that is deeply rooted in my own experience as a stay-at-home-feminist-mom. The first big installation I created was about giving voice to other mothers. Being a parent has given me a perspective on humanity that was deeply needed for my art-making, but not available to me until I’d had the experiences I have.
I didn’t trade my values and career for having children; I traded my early career for the extremely powerful, feminist privilege of parenting my children, full-on. Or, to shift the focus a little, I am using my chosen experience as a stay-at-home-feminist-mom to build a stronger foundation for my career, and thus hopefully to smash the patriarchy, even harder.
"Children are the most disrespected group of people in the world."
She turned her small face and looked at me intensely, maybe to see how I would react; maybe to be sure I heard her. She was one of a group of three teens who had just come through an installation about children's rights and left her comments behind. I hoped she felt respected by me as she walked out of the gallery.
And then it hit me: "Group of people." That's how we see them. We see them as separate from us until we judge them to be old, wise, or experienced enough to earn our respect – as adults. We determine their clothing, their food, their education and other activities, their freedom to come or go and quite often we even determine their friends and hobbies. They tell us their fears and hopes and great big plans and we pat them on the shoulders and ignore them; carry on with our lives. When do we look them in the face and ask them to tell us more? When do we ask their advice? When do we heed it?
I grew up and eventually returned to raise my kids on a small island. For longer than I've been alive, the teens from this island have boarded a ferry five or more days per week to attend school on the mainland. Unchaperoned. As a teen I got up at six-thirty, washed my hair under the tap, dressed, put on my makeup and left to walk to the ferry at seven. In the winter I arrived at the dock with my hair frozen like brown sticks around my face. Unlike some of the other girls, I did not push into the crowded washroom to fix it in the two tiny mirrors. I sat at the end of my age-group of kids, watching the same kids get beat up day after day, watching the animated conversation of some girls I wasn't friends with, picking at the Naugahyde seats and avoiding the splash of the food fights. I moved further down when people started bringing compost to throw.
Twenty minutes each way. Morning and afternoon. The ferry commute was a drag, and a shared ritual, and also the rocking, floating bridge between the confines of childhood and the expected freedom of adulthood. In the 80's we skipped school by going en masse to the mall first thing, then arriving at school before lunch to report that we were all late because the ferry was late. We sometimes argued about the ethics of how to accomplish this feat. We shared time every day, but we were individuals. We had different stories, different values, and different lives.
Our island also has a history of ferry exclusion. As a public-private entity, the ferry corporation has the right to ban people, and they have done so on various occasions that I remember. They banned a teenager in my grade for vandalism and mischief. He eventually took the ferry with a chaperone to attend school. They also banned our local petty criminal because the police thought it would do him good to get out of the community where he regularly slept in parked cars and picked drunken fights in public. It didn't help. Community members transported him back to the island in the trunks of their cars. My point is that these people, too, are individuals.
At various times we've had issues arise on the busiest ferry runs, like unidentified persons vandalizing the boat or flooding the toilets, and sometimes the first response is for the captain to make announcements to the teens. He tells them, as a group, to smarten up and behave themselves. He tells the adults on the next commuter run to rein in their children. Recently people in the community have been wondering aloud in public why teens (again, as a group) can't just behave themselves for twenty minutes at a time. Few, if any of us, know what the current transgression is, but we know it's been committed by teens. The captain has reportedly announced to our teens that if the unnamed incidents don't stop, the police will be involved and the surveillance footage will be reviewed. For me that crossed a line.
If criminal acts are being committed, it's perfectly reasonable to check surveillance footage and involve police. It's perfectly reasonable to expect people not to commit such acts, and to take steps to ensure that they stop. It is not, however, reasonable to reprimand, admonish, threaten and sometimes (as I have witnessed) deny service or civility to an entire group of people based on the premise that one or a few of them are suspected of having done something wrong.
When adults smoke on the ferry (which is wholly a no-smoking/no-vaping zone), they are asked to butt out. If they refuse, they are taken to the chief steward's office and spoken to, as individuals. I've seen this happen. I've stood at the chief steward's office while an adult smoker was being spoken to, and every effort was made to treat me with respect and provide me with service despite the fact that I, too, am an adult. The same can't be said for our teens' experience. Every teen is a suspect in some people's reasoning.
What do you think that does to a person? Imagine if every day you walked to work only to be eyed suspiciously at the door to the building, and every time a toilet overflowed, people called all the adults in the building together to reprimand them. How would you feel about using the toilet? Imagine if, when some person stole from the vending machine, they denied all adults access to the vending machines. Would you respect the people who judged you? Would you still care about upholding the values of your community if you weren't expected to uphold them anyway?
I'm responsible for denigrating teens as a group, too. When I was barely more than a teenager myself, a truck full of students from a nearby high school pulled up to my grandmother's lawn, dumped an assortment of fast food wrappers out the window, and drove off. A few years later, walking along our island road with my four-year-old son, we spied some litter in the ditch. He immediately shook his head and muttered grumpily, "ach… teenagers". I can't remember how I led him to that assumption, but I am certain I did. Now he's seventeen. He and his sister have somehow managed to get through a bunch of teenagehood without dumping their trash. Even more than navigating teen years myself, parenting teens has taught me to see them as individuals.
Teens are worthy of our attention as individuals. They are humans learning to be adults, and counting on our respect and exemplary modeling to help them navigate their surprising, sometimes frightening individual journeys. If we want them to see adults as individuals rather than a homogeneous, brooding group, we need to model to them how to do that. We need to see them, and we need to show them how seeing people is done well.
Some teens are children. They have an innocent wisdom not yet drawn out of them by the pressures of growing up. Some teens are also adults. They know their own minds and they know when they haven't done wrong. Some teens see us when we're wrong, and they know when we aren't hearing their voices. Some teens know when not to bother speaking up, because we've lumped them all into one disrespected group and we can't hear their individual cries. In fact, when teens report crimes committed by adults, they are often ignored.
It's time we look into the faces of the children and teens we pass and see them as simply humans. It's time we see them as individuals with wisdom, needs, values, and human rights. It's time we respect them.
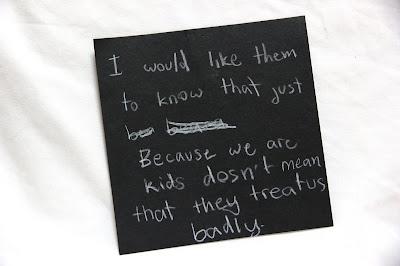
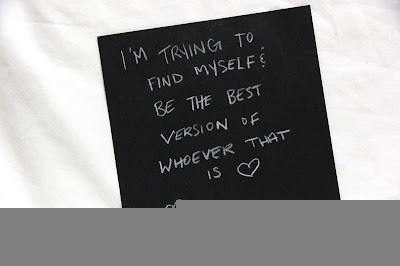
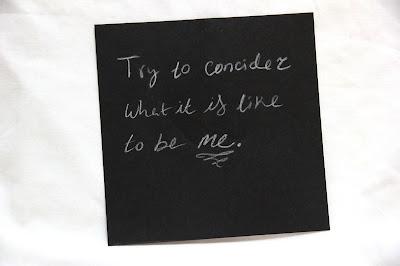
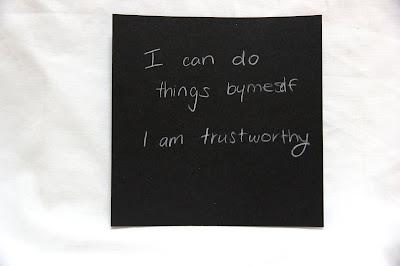
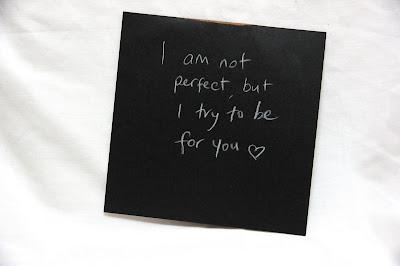
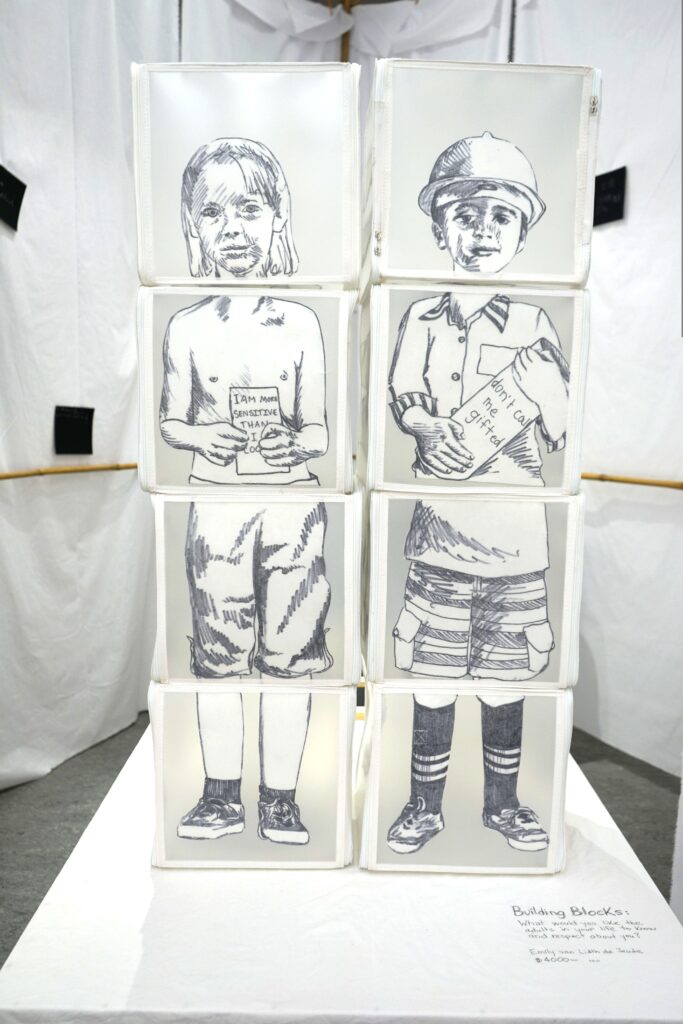
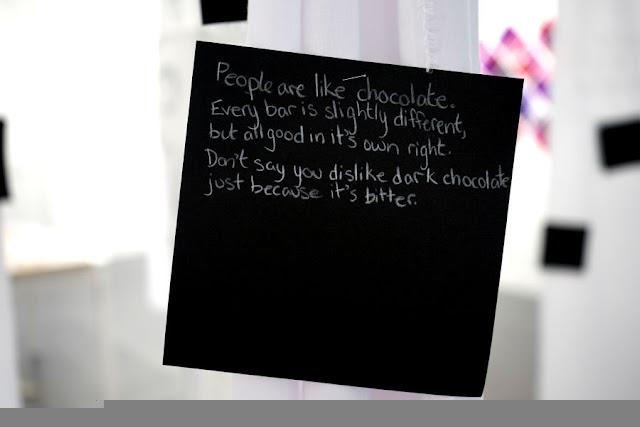
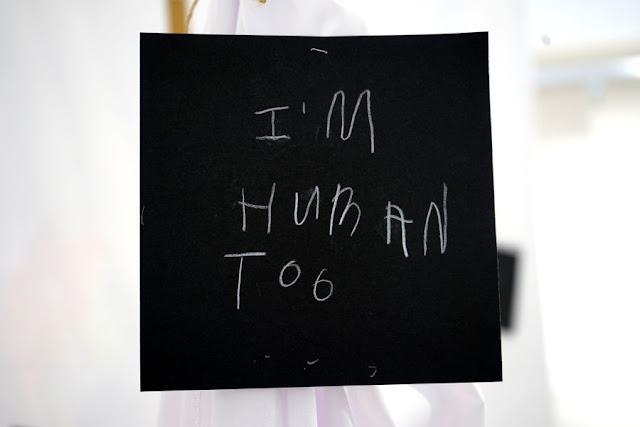
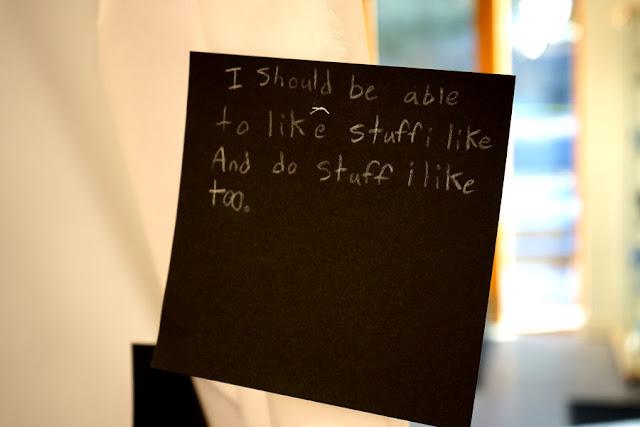
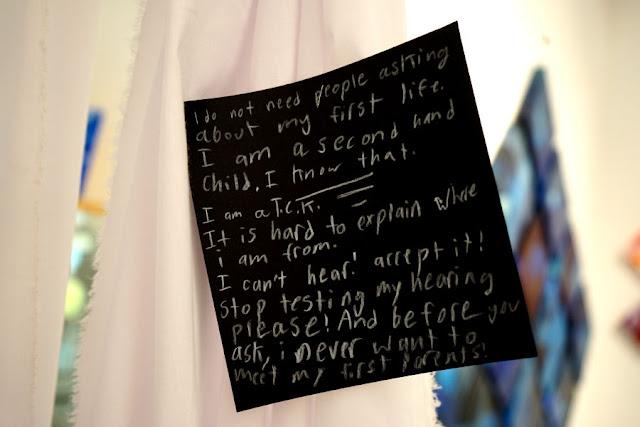
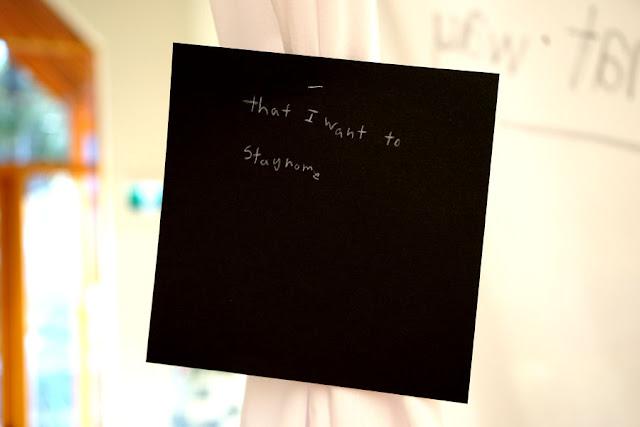
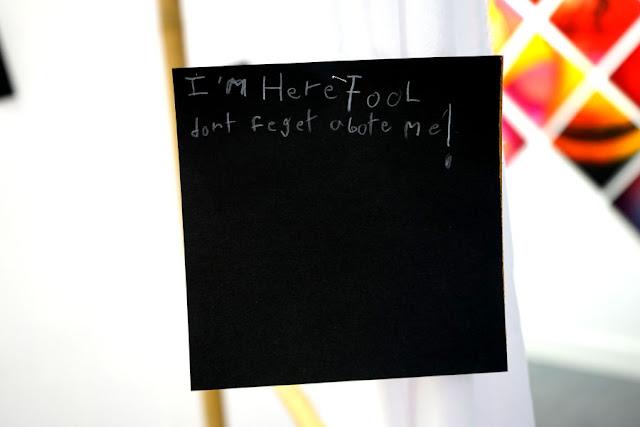
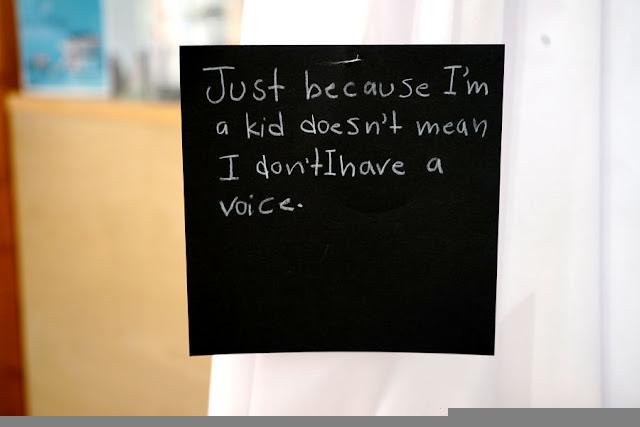
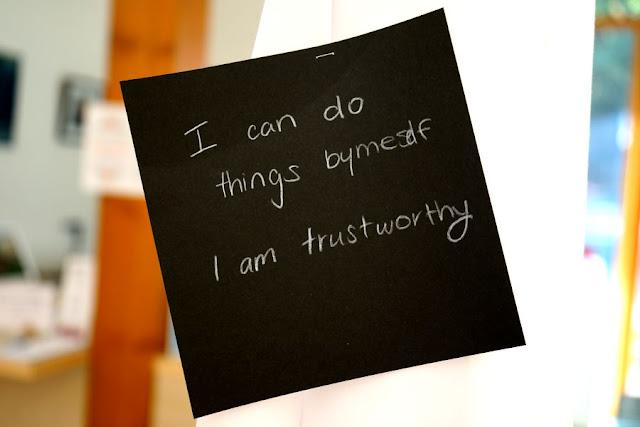
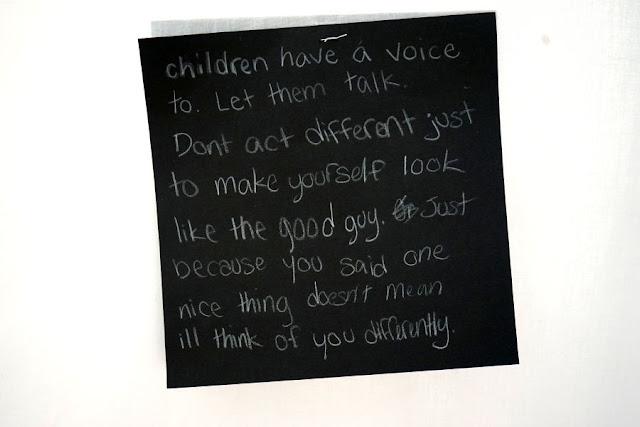
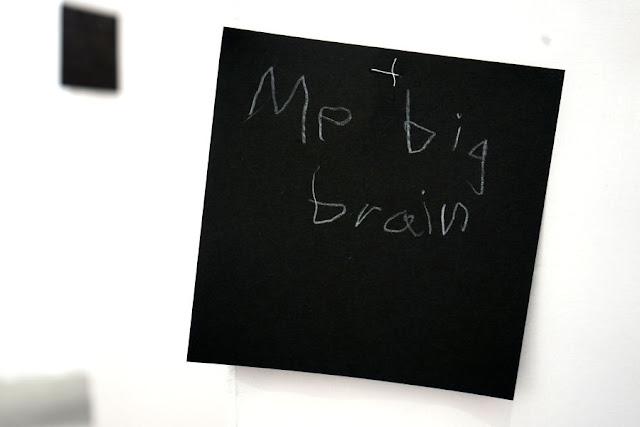
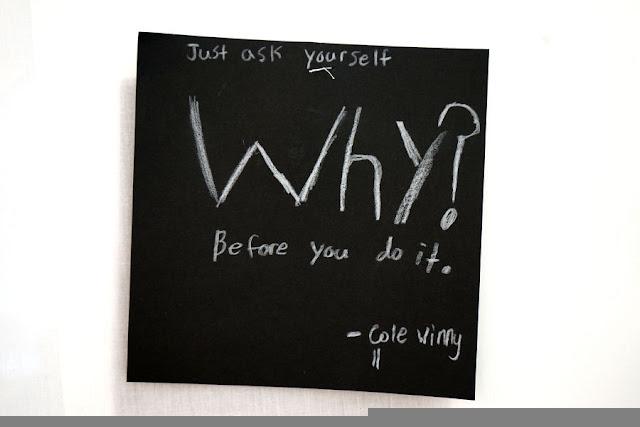
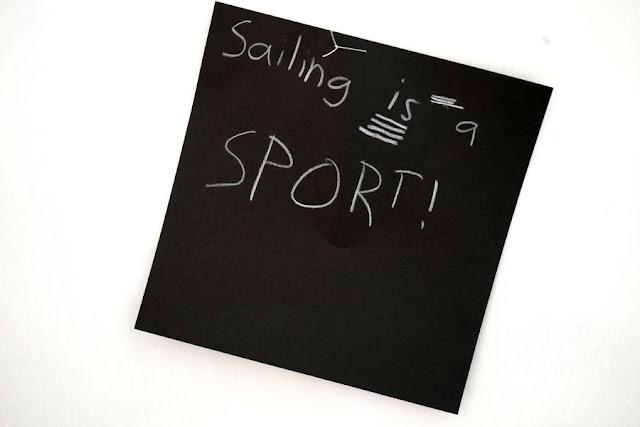
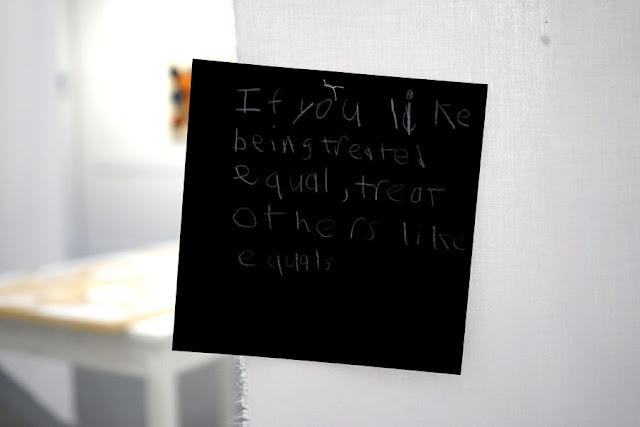
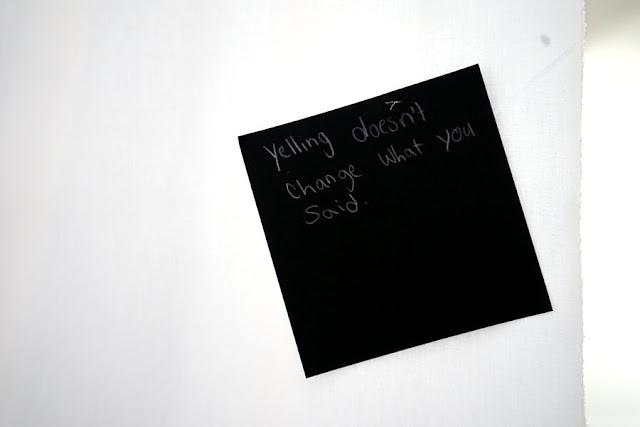
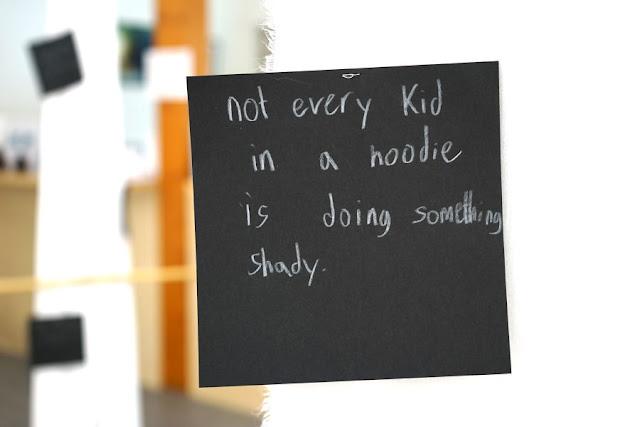
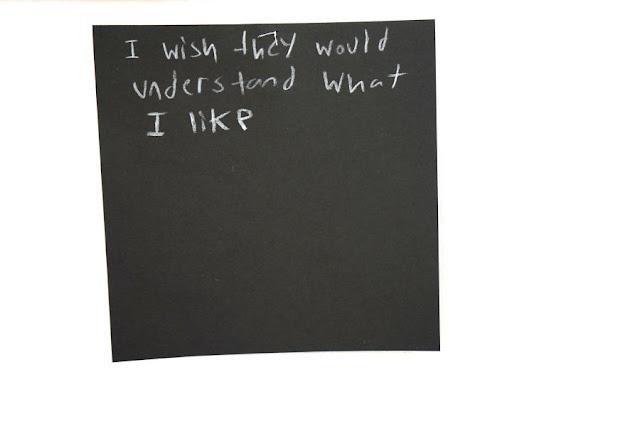
*The handwritten statements accompanying this article were contributed by teens at a 2019 installation of a piece called "Building Blocks: What do you want the adults in your life to know and respect about you?"
My 2019 exhibit included, as its central installation, this piece about children's rights. It's made of plastic clothing storage boxes, which I covered in portraits of children, holding signs that state their various answers to the question, What would you like the adults in your life to know and respect about you?
The children who contributed the answers for this sculpture range in age from 5 to 17, and the sculpture is interactive. Visitors to the installation were encouraged to put on white gloves and play with the cubes, rearranging again and again to make a vast assortment of different children.
The installation included a small tray of black paper, where young visitors could write their own answers to the question. I hung these answers around the installation as they appeared.
These are the voices of our children – mostly anonymous children, and therefore everychild. These are the things that all children need us to know. They need us to shed our busy-ness, our righteousness and our preoccupations and hear their voices. And their voices keep coming. Let's be good listeners.