After my dad died, in 2015, my Mum saw me grieving and told me to paint something beautiful. I didn't have it in me, and I painted a whole lot of anger and pain. Sometimes we just have to paint our truth. But… what we create becomes our truth, as well. My mother also told me–countless times throughout my life–that if I wanted to feel happy, I could just make myself smile. That's the last thing you want to hear when you need to be seen and heard; when your experience needs to be acknowledged. But it's also true. And it's been the way I manage the worst experiences life throws at me. I stretch my lips out sideways, rub my cheeks vigorously, and just grin. I fake a laugh until I feel how silly I am, and it becomes real. I paint the most beautiful things I know–the birds and trees and plants and wind and flowers–until their beauty fills up the void left by the pain.
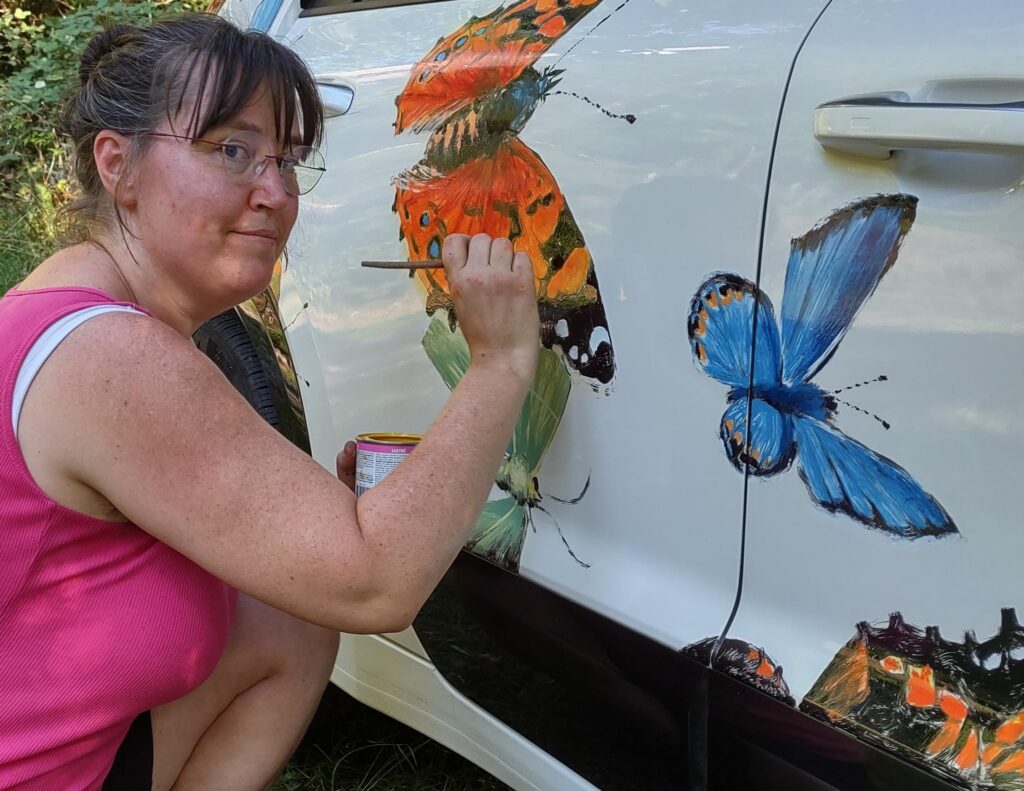
When my mother was dying, I painted my car. I covered it with butterflies. "Why?!" People asked me. "Oh the resale value!!" But I did it because beauty. Because the local species of butterflies and moths I painted remind me of a happy day in my garden, and of the butterfly-effect, where small acts of beauty (like painting my car) might in turn create much larger beauty. I painted it because I don't want to live in a world where something as essential to my life as my vehicle is effectively just a gamble against the future, waiting to be re-sold. And I painted it because my mother was dying, and I needed something joyful to do, in between the doom and pain that pervaded our days.
It's not that the pain is really gone, of course, just because we create some beauty. We still need to deal with the horrors of life, and to heal the pain, itself. But at the same time, the world is carrying on around us, and we are contributing to how it grows, whether we're aware of it or not.
Decades of studies have shown us, by now, that the media we consume affects how we experience the world around us. What about what we create? What about how we create? I spent a few years creating social media videos about our local ecology and my nascent regenerative food farm. Making the videos forced me to consider the way I spoke about those things. Editing the videos made me think about how my words would come across to others. Publishing the videos exposed me not only to generally positive feedback from viewers, but also to other videos with similarly nature-celebrating themes that came up in my own feeds.
On the other hand, I've also landed in negative feedback loops, for example when posting my negative political views on our local forum. People fought me, I became angry and argued back, people stated all kinds of further negativity, and generally the conversations devolved, and community bonds broke. I'm not trying to imply that we shouldn't speak up for causes we think are important, but how we do it matters greatly.
What if, instead of calling out harmful things we notice (or in addition to calling them out, if they really need to be stopped imminently), we built the world we want, right alongside the world we don't want, and just lived in that world we want? Would others join us? I think so! Or maybe they'd all be building their own utopias, and one day there would simply be more of us living in joy than in fear and resentment. What if, instead of being ugly with our thoughts, we were beautiful?
It's not possible to be beautiful all the time. Sometimes we just have to curl up in a ball and let the sad times roll over us. But I feel like I come out of such times healthier when I've cultivated enough beauty inside of me that some of it is still there to blossom, when the tears dry up. Then there's more of me to go about building the world I want, by making all life's little choices in line with my vision for a beautiful world.
My mother's gone, now, so I have to summon the memory of her voice in my heart: Emily, make something beautiful. And I, like she, and like you, have to be that voice for ourselves and others. Go make something beautiful. Be beautiful. Find what brings you joy and cultivate it.
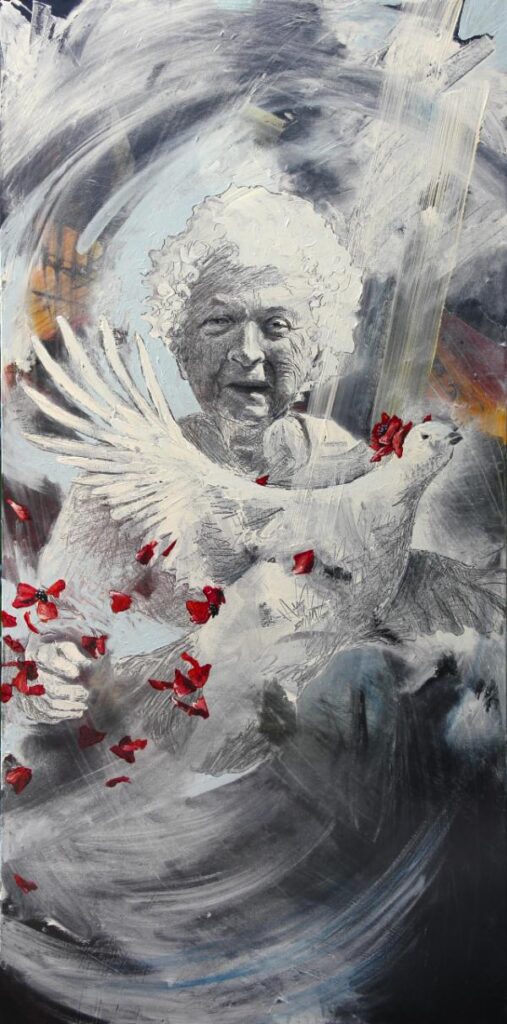
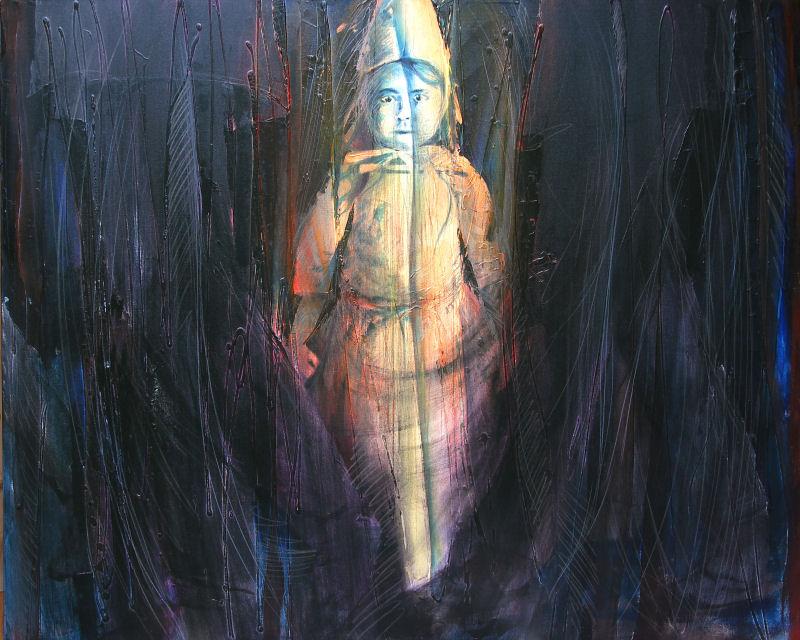
Grandma Frees the Ptarmigan, oil and graphite by Emily van Lidth de Jeude
The audio version of this story is available on my MakerTube.
Dear Little Emily,
You’re sitting on the floor of Mum and Pappa’s house, by the big brown bookshelf and the wide darker-brown row of Encyclopedia Britannicas. You have one open on your lap—number twenty-two—its huge brown covers rested against your bare knees, and you’re running your finger down the one of the many shiny, thin-paper pages of the PSYCHOLOGY section. Jeez there are a lot of things to say about psychology. But nowhere, not anywhere at all, do you see the word ‘psychosomatic’ popping up. Finally, after picking through hundreds of words you can’t bother to try out, you land upon this: PSYCHOPHYSICS, "a department of psychology which deals with the physiological aspects of mental phenomena." Mental. Grandma is a mental case, that’s for sure.
And amazingly, like the heavy book is calling her right out of crazy-land, the next listing in the book is PTARMIGAN. "A gallinaceous bird akin to the grouse." Whatever that means. It says it’s Gaelic, which is impossible, because you know ptarmigans are Canadian or Ukrainian. Grandpa is Irish and he never mentioned a ptarmigan. Grandma says ptarmigans live in Ukraine and in the Rockies, so. There they are.
But what the hell. Psychosomatic. It’s not even in the encyclopedia, right? Like even the definition of Grandma’s craziness is not in the book, that’s how imaginary it is. And the encyclopedia, now you’re nearly twelve, and it’s nineteen-eighty-seven, is the biggest, most trustworthy source of information in existence. As far as you know, little me, and you know more than some eleven-year-olds, but not nearly as much as you think you do.
You’re thinking about the last time you visited Grandma. Daddy dropped you off there for a sleepover, which seemed like a wonderful escape from the terrifying basement corner that you have to sleep in, at his house. But soon you realized there are other kinds of bad.
You sat in the wooden nook while Grandma smoothed her long, pearlescent nails. They’re three times as thick as your nails, because she’s old (though not as old as most Grandmothers, Mum says), and her nails are all covered with ridges, which she fills with layer upon layer of nail polish. You heard the plastic scrape of her nails; the rattle of her bracelets, and you shifted your gaze to the pink and turquoise squares of the kitchen floor. She was still talking, and you were getting tired. “The Devil lives in her,” she went on. “He lives in her mind and when she dies he’ll take her away to his lands.”
This wasn’t the first time Grandma professed to understand the Devil’s behaviour, and it usually somehow involved Mum. Mum says it doesn’t matter because we don’t believe in the Devil, so you sat quietly just waiting for Grandma to finish. “People who leave their husbands are evil,” she continued. “Your mother has the Devil in her heart, and you were born from that woman’s evilness. You have to pray to God to take it out of you.”
“I don’t believe in God,” you said, then, looking bravely up into Grandma’s wrinkly face; her nose kind of lumpy, in a way that made you think that must be the Ukrainian coming through. The angry concern in her sinister eyes leaked out the wrinkles of her face and into the perfect curls of her permanent-set hair. She looked like she might bite you, but you were too tired to care. It would be hours before Daddy would be there to pick you up, and by this point you thought you might fall asleep right there on the table, next to Grandma’s hands, her plastic bracelets rattling beside your head.
“Your mother taught you to say that. She put the Devil in you.”
“I’m so tired, Grandma,” you pleaded.
She looked up then, again, from her nails, and appeared surprised. “Oh, yes, dear. Would you like some Sprite?”
“Can I lie down on your bed for a minute?”
“Of course, doll-babe,” she replied. “I have to go call in the sun.”
You walked down the short hallway to Grandma’s bedroom as she slowly descended the brass-rattle staircase to the basement door, where the sun had begun to peek through, from the cedar trees, outside. “Come on, Sun!” She exclaimed. And, “oh hello, how’s your morning?” She asked of some random bird flying through her yard. And you lay there on her perfectly pink bed thinking about the mystery of fibromyalgia that caused Grandma to stand in the doorway and soak up the sun, every time it shone; that caused her, also, to keep her house a few degrees above normal, because supposedly it helped her pain. Grandma says she has fibromyalgia. Mum, Daddy, and everybody else say she has psychosomatic illness. It’s all in her head. And the Encyclopedia Britannica, for all its wisdom, has declined to comment.
You woke up with Daddy’s hand on your back. Somehow in your thoughts you’d slept two whole hours away, and it was time to go home.
Home is a place of reason; a big tree-speckled yard full of food plants and flowering plants, some ponds, rabbits, chickens, a dog and a safe house to live in. No gods or devils, no ‘fairytales’, as Pappa calls them. You eat what you grow and you see how the actual world works. Everyone is upfront, or so they say. And illnesses are real—the kinds of things you can check with a thermometer and heal with cough syrup, chicken broth, and Earl Grey tea. Nobody has psychosomatic illness in this home. Nobody also calls in the sun, nor talks to birds.
Mum says it’s not really Grandma’s fault she’s crazy. She was born to parents who fled when Russia invaded, and that kind of family trauma can make people a little strange. Grandma says she remembers her own mother hiding up in the trees as her entire village was murdered. Grandma says this as if she herself was in those trees. Which is impossible, of course, since Grandma wasn’t born, yet. But she remembers. Daddy says Grandma is just wasting Grandpa’s money by keeping the house so warm. Pappa says it’s none of our business what she does with Grandpa’s money. You just wonder why Grandma doesn’t have her own money.
Times are going to change, little Emily. Here I am, writing you from twenty-twenty-five—a date you likely find it difficult to imagine. I found it difficult to imagine the year two-thousand only months before it arrived! But here we are. You’re grown. Me. We even had kids who’ve grown up, by now. Russia is beating the shit out of Ukraine, again, and Grandma didn’t die of war or fibromyalgia; she died of strokes, kind of, in the end. Mum died of a brain tumour, and so far as I can tell, the Devil didn’t take her, because I still hear her voice in my head, sometimes reassuring me, sometimes giving her opinions, and sometimes shrieking in alarm. Maybe it’s the Devil after all. Who knows. And I have fibromyalgia.
Yeah. You. You, when you’re grown up, little me, are going to have fibromyalgia, just like Grandma. And no family member is going to dare tell you it’s all in your head, because they’ll all watch you experience the pain and struggle that this stupid illness involves. In fact, one of the doctors who diagnoses you will mysteriously test a bunch of seemingly-random spots on your limbs for pain, and when they all hurt like bruises, she’ll explain that those pain spots are specific to fibromyalgia. She’ll then suggest self-treatment by using saunas, keeping your house warm, and perhaps also trying infrared therapy. Infrared light is contained in sunlight, little Em. The doctor will one day tell you to call in the sun. Well… metaphorically-speaking.
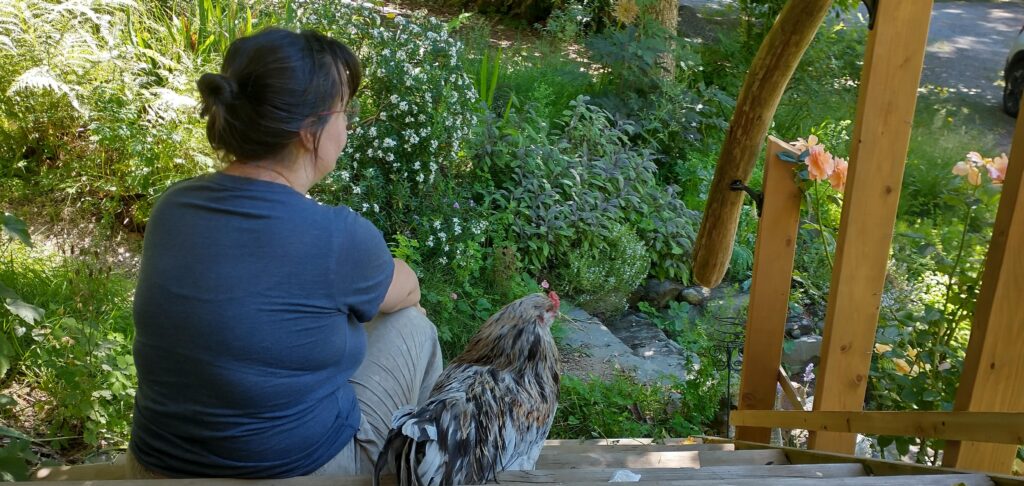
You’re not exactly going to start calling in the sun. But I do try to soak it in as much as my fair skin and hot flashes will allow. I sit out there on the porch, watching the yard of this place you grew up in and that I eventually raised our own children in. I see the garden where I still grow most of our food, and I watch Eamon, the raven who’s been living around here for a few years now, fly low over the sunflowers, and land under the walnut. “Good morning, Eamon!” I call. He doesn’t answer, but sometimes when I’m in the garden he calls, and I do answer. We play a game where I copy his calls, and he changes them. Or at least I think we play this game. Maybe it’s all in my head. Who cares.
Tripping a little over an unexpectedly-high tuft of moss on the log I was stepping over, I heard shouts from the children, up ahead, and looked up to walk smack into the dangling tips of a soft wet cedar bough. I brushed the water off my face as the shouts were joined by gasps of horror or awe, and then guttural, powerful noises, and a loud “YEAH!!” As a small arm jutted up above the ferns that still stood between me and the kids, holding a rather long piece of deer-spine, that then fell apart in mid air, dropping a piece of itself unceremoniously back to the forest floor. The kid holding it up looked a little disappointed, but continued smiling, as they and their classmates experienced what was, for some, the first sight of a nearly-complete deer skeleton.
Some of the kids gathered as many bones as they could carry; some fought for their perceived rights to the skull; the spine; those amazing paddle-like shoulder-blades that always seem to become useful tools in the hands of ten-year-olds accessing their powerful, primal nature. Some stood back looking alarmed, and one kid was wearing the pelvis as a hat. A wide-eyed girl ran up to me with a piece of the bottom jaw, pulling a tooth back and forth in its socket. “It comes out! Emily, the tooth comes out!” She exclaimed. “It comes out and it fits back in!” Was she amazed by the perfection of the way bones fit together, or by the access to an understanding of her own teeth; those things that had come out of her mouth with some celebration, and then grown there again, anew? Maybe she was just amazed at the tactile delight of it all.
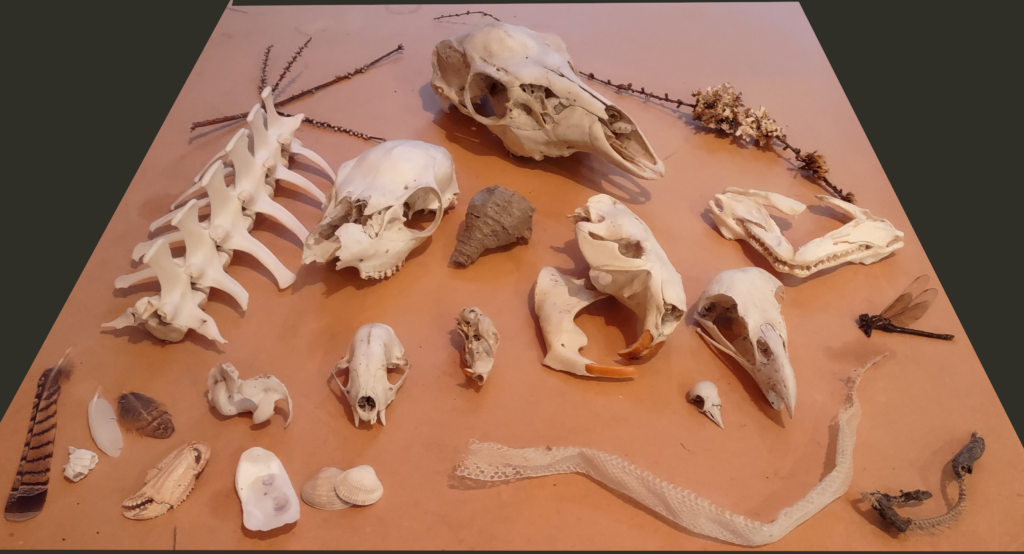
Tidying up today for this weekend's open studio, I dusted around my bone collection, as usual. There were a few dead flies on them, as well as a few spiderwebs, and thankfully not too much dust, because dusting feathers—and especially that desiccated dragonfly—is a pain! Every time I pick up the rat skull, one of its massively long curled incisors tumbles out and I have to slide it back into that channel that grew to fit it perfectly, when the rat was alive.
Most visitors to the studio just come to buy a painting and don’t even seem to notice the bones, but I want them to look clean, anyway, because there’s something kind of yucky about dusty bones that’s improved by being cleaned. And anyway, sometimes people do notice them, and ask about them. I'm always a little nervous to divulge that I actually almost never draw or paint from these. Some people assume I do, and I guess I might think the same of another artist; imagining her like Georgia O'Keeffe, describing all the beauty of these things in charcoal and paint. But no. They mean so much more to me than just a subject to make a picture of.
When I clean the bones, I’m reminded of their differences and similarities. I have a rat skull from the compost (caught by our cats and delivered there to decompose, by me) and a beaver skull that my brother found down by the creek. Both have those amazingly long, curled incisors. You can imagine how, as the rat chews away at the wood of the chicken coop, or the beaver gnaws the trees down by the creek, they’d wear them away and need that long reserve to keep growing in. It also reminds me why it’s so important to give pet rodents something to chew. Compare that to the teeth in my deer skulls that look more like barnacles; not meant for cutting through wood at all, but just gnawing on their tough fodder of grasses and my roses, if the gate is left open. If they fall out they take a while to regrow. Unlike shark teeth. The little baby hammerhead jaw my daughter’s friend brought from Mexico is a reminder that a shark can’t go long without its teeth, so it keeps an entire collection of them behind each pointy front tooth, just waiting to move up into place, when space is made. I’ve known some children who had what we called “shark teeth”—baby teeth that never fell out but just stayed there in front of their growing adult teeth. They feel to me a bit like backup-teeth. Not like the canines on that otter skull. They have no backups, waiting. I imagine if otters break a canine they’d suffer for a while. Maybe that’s why they’re so vicious. They can’t afford to lose a fight. The teeth of these skulls have such stories to tell, as much in the ways they’re similar to each other and to me, as in how different they are. Different lives; different needs; different priorities. But still with the same basic bodily needs.
You’d think there’d be few similarities between all these toothed animals and the bird skulls I have, or the barnacles and bivalves. But I see the similarities there, too. The beak of the eagle is in many ways a bit like its talons; you know how easily it would puncture and tear the body of that little flat-beaked songbird, holding one half under a talon and hooking the other half with its beak. The songbird’s skull is so light I can blow it off my hand by accident while trying to get the dust off. It’s made to fly. And that’s how it escapes the eagle.
The barnacle, of course, looks like a molar. Of course we know barnacles are filter-feeders, reaching out their elegant and feathery feeding legs to catch floating foods under the waves, but then why are they shaped like teeth? If you’ve ever stepped on one in bare feet you’ll know why. It’s protection. Same with a shark, or an otter. One of the ways human children defend themselves is by biting. That’s what teeth are for, too! And the bivalves. Nothing about them can be considered tooth-like, it seems, until you remember that there are razor clams. You don’t want to step on those, either! And sometimes, on shells, I find the little curved bits at the edge and remember that that’s where the clam’s mouth comes out to feed, or sometimes its foot. Because clams walk through sand. And fast, too, as you know if you’ve ever tried to dig for one.
I look at all these bones and other body parts, and I feel connected to the world. I feel joyful that in our great diversity, we’re still all related; that our bodies have evolved to succeed in diversity and community. In this collection I also have lichens that remind me of our strength in living collectively with other species; I have conifer "berries" (not actually berries; I don't know what they are) that usually grow unnoticed in the tops of enormous trees, but which I collected off the ground. They remind me that there are beautiful processes we hardly notice for their being out of our usual sight, until a storm comes and knocks us all sideways, and we see things differently. I remember that all change is growth; even death. I remember that there is joy in just the smooth feeling of these bones; their lightness and their heaviness, the things I understand about them and the things that are mysterious to me. I remember the delight that I or others had in finding them, and I feel the sorrow that these lives ended, and the comfort of knowing our commonalities; the aliveness of just knowing we exist. I think of these things and I remember that everything is beautiful.
This story is also available in audio form, with pictures, on MakerTube.
Dear little Emily,
Today, when you’re almost ten, my little old self, you’re sitting in the dark sparkly sand by the waves lapping. Barnacled rocks poke up from the sand into your thighs, but you don’t care. You have Pappa’s sweater on over your swimsuit, and you’re fine. You hear Mum’s guitar up on the beach, and she mutters that her fingers are too cold to play, even though the fire is right in front of her. It’s September and the family has gone to the beach, maybe for the last time, this year. It gets dark so early right now that it feels almost like Christmas, even though it’s 8pm, and you haven’t gone home for dinner. The end of the box of Old Dutch crackles between Adrian and his friends as they sit around the fire. The aunties are chatting and you can’t hear what they’re saying, but Pappa’s laugh breaks the night for a moment. You’re waiting for the stars to come out, and your heart sings,
Oh watch the stars, see how they run! Oh watch the stars, see how they run!
Mum stops playing her guitar with a definitive hand-thud on the wooden body, and announces it’s time to go home. It was supposed to be sunnier, today, or at least you thought it would be, when it was sunny this afternoon, and you dug up the potatoes in just your t-shirt and shorts. Your bare feet had carried half the garden in with you, Pappa said. Now you’re washing them in the course gravelly sand, and you don’t want to go home.
The stars run down, with the setting of the sun. Oh watch the stars, see how they run!
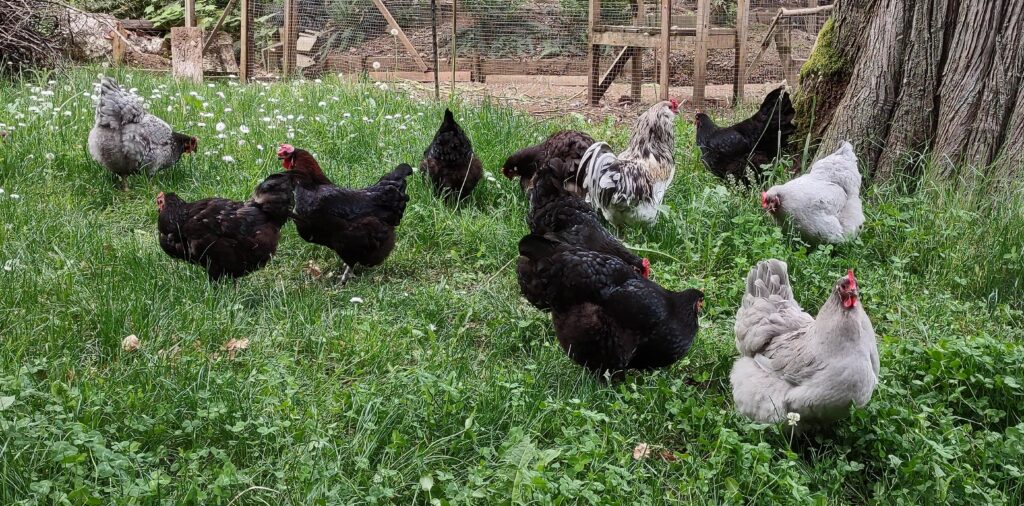
Home is a glorious converted trailer, that Pappa renovates every few years to add a little more to your bedroom. Home is where the sun peeks up over the cedar trees to come flooding slowly over the veggie garden at ten, on autumn mornings, spreading yellow over the dewy grass and the starting-to-brown veggie tops that haven’t yet been harvested. Home is where Mum does canning projects with you; sometimes they’re delicious and sometimes nobody wants to eat the zucchini pickles. Remember that year when you slipped on the log of the lettuce bed and fell splat in front of the rooster and he jumped on your face, and you were bleeding? Well I’m fifty, now, and I still have the scar. Mum said it was because he was an Araucana, and they’re so vicious. You avoided him after that, and warned your friends away from him, too. I wish you knew about Splashy.
When you’re in your forties, your teenage daughter is going to ask to get chickens. Partly out of motherly encouragement, and partly with a giddy childish excitement, you’ll agree to your daughter’s plan, and buy twenty-nine fluffy little chicks, who will spend their first few weeks in a makeshift brooder in your daughter’s bedroom, while the whole family works to finish the best-chicken-coop-ever.
This will be your first experience of “chicken math”, as you’ll later learn to call it. Chicken math, apparently, is when you calculate that eight hens and a rooster would be perfect to keep your whole family in eggs for most of the year. Of course you’ll need twice that many chicks, since half might be roosters. So sixteen, then. Seventeen for good measure, just in case. And you’ll make sure to get some winter-hardy breeds in the mix, so you still get eggs when it’s cold. The mix. Since you want a mix of breeds (brown eggs, pink eggs, blue eggs, and green eggs!) you really should hedge your bets and get at least four of each type, so there might be at least two hens of each breed, after the initial rooster cull. And since you’re buying so many breeds, well… twenty-four isn’t such a bad number, right? It will be twelve after the cull. Approximately.
Breeders are also approximate. And generous. So somehow the number will blossom from twenty-four to twenty-nine by the time the adorable little peeping boxes of fluffballs arrive. Whatever. Chicken math. More meat in the freezer, you’ll say to yourself. And by autumn you’ll indeed have plenty of meat in the freezer, as well as thirteen hens and two roosters. Lester Clark because he’s big, and the Splash, because he’s so cute.
There will be two Ameraucana chicks in that brooder in your daughter’s bedroom, and you’ll spend extra time with them, because they’ll lay green eggs. One of them will turn out to be a mean little hen, and eventually die of some sort of undetermined internal ailment. The other will be a rooster. Despite being very close in genetic heritage to that rooster who gored your face in the garden when you were little, he’s not vicious. He loves you. You will eventually figure out that he’s infertile as hell, though unfortunately you won’t realize this until after Lester Clark pecks his right eye in, and after you kill that giant mean Lester and eat him even though his meat is tough.
You will realize Splashy’s place in the family one day after his pecked-in eyeball will have risen back into its socket, and there in the sunshine of the day will be a giant squawking fracas in the chicken coop. You’ll run into the coop to find Lester Clark just standing there like a giant oaf by the coop door, Splashy having an epic battle with a giant red-tailed hawk, and all the hens crowded with their faces pressed into the corner of their house. Godiva, the actual boss and Splashy’s faithful companion, will be leaning with her back against the other hens, wings spread open to cover them, screaming wildly in the direction of the hawk. In a moment of adrenaline-fuelled foolishness, you’ll grab the hawk off of Splashy and throw it out of the run. You’ll pick up your sweet bloodied rooster and nestle him into your arms. Godiva will release the hens to their business, and Lester Clark will have his neck slit and end up as stew.
So there you’ll be with eighteen hens, and just infertile little Splashy to protect them all. (Yes I know, I said thirteen, but suddenly there will be more chicks, so… chicken math.) Splashy will originally be called ‘the Splash’ because he is a ‘splash’-patterned Ameraucana. You know, like you might call your neighbour ‘the buzz-cut guy’. But the hawk incident will reveal that this little scrappy black and white dude is in fact The Splash. Not just the only splash-patterned chicken in the flock, but also the feeder of delectable grubs to the hens, the protector of chicks and brooding hens, the announcer of sunshine in the morning, the afternoon, and the moon in the middle of the night, the hunter of rats even in the pitch black, and the faithful companion of Godiva, who is the boss of him, too. Splashy will be The man.
Splashy, despite incongruously being an Ameraucana, will be the only chicken ever in your life who actually wants to be picked up, and when nestled into your adult arms, will promptly fall asleep—always, and without fail. His little whitish eyelids will sink upwards to close, and he’ll murmel his beak like a little old man, contemplating. He’ll need to rest from his constant vigilance over his flock, and your arms are the only place he can do that, most of the time. He’ll become your little love. He’ll hop up on the box outside your bedroom window, crane his neck inside if the screens are off, and crow into your face until you get up, scratch his tiny little wattles, and tell him good morning. Then he’ll go back to stomping circles around the younger hens, herding any potentially-broody hens into nesting boxes, and having his head checked for mites by Godiva.
It’s always a special day when eggs hatch. You’ll know it’s time, because chickens’ hearing is much better than yours, little Em, and they’ll all be standing around craning their heads towards the nesting box for a few hours before the first chicks pip. As hatching days go on, the best brood hens will chase every other chicken away, besides Splashy and Godiva, the undisputed leaders of the flock. And they’ll come and go, eating some chick feed, rearranging some bedding, and often just standing silently, listening to the peeping from under their broody flock-mate.
After a few days, when the hen emerges with her brood, Splashy will stay nearby, standing sentinel between her chicks and any potentially-ill-intentioned other hens. He’ll support her and her chicks until they’ve grown big and independent, running freely all over the yard, digging up your veggies, and roosting in trees that the older chickens can no longer fly to. After a while, Splashy will start chasing away the little cockerels, until eventually you’ll move them to the bachelor pad, before slaughter day.
Slaughtering is not something you will ever enjoy, little Em. I know you’re semi proud, right now, that you can butcher a chicken or rabbit without help, but you don’t have to do the killing yet, now you’re only nine, and Pappa still kills the livestock for you. He’ll teach you, of course, eventually, to kill your own meat. But all of your life until you’re me, now, at fifty, it will still be hard to do. I think I turn off my heart to do it. Slowly. That’s why we have a bachelor pad, now. Practically, the separate run for roosters is a means to feed them their own high-protein feed, and keep them from fighting for a few weeks while they put on some meat before butchering. But it’s also the place I harden my heart against them. I distance myself as I bring them treats. I stop calling them “my love” or “sweetheart”, and I stop loving them.
When slaughter day comes, I take them to the cone, and get the job done, silent tears falling, but no big fuss. They’re just meat, now, as Mum says to you. We’ve learned to do this more humanely, now, settling the gigantic feather-monsters into a big aluminum cone, and gently guiding their heads to hang out the bottom, where I slit their necks until their blood runs straight into the bucket, below. They bleed out in less than a minute, kick their legs mindlessly as their muscles lose contact with their brains, and die. It’s a lot less traumatic than the way Pappa does it, holding them against the ground and chopping their heads off against a board, then holding their flapping, kicking bodies away from himself, as the blood spews. You’ll learn to do that too, of course, before discovering the cone. But the cone will be a relief. A small bit of mercy in a horrible job. But, as Mum and Pappa always say, if you want to eat meat, you need to accept that you’re eating an animal. You need to kill.
Splashy never went into the bachelor pad, of course. He walked around to look at the young boys in their new digs, but he never went in. I always wonder if he knows where they’re going, even though we take pains to never slaughter within view of the other chickens. It’s funny we call these choices “humane”, when humans are probably the least compassionate species ever to exist. Not true, Splashy would say, as he tilts his one good eye up at me and clucks. He loves me, and as of now, I know he thinks I’m compassionate. Or at least he did when I killed him.
For the past year, Splashy’s had some kind of neurological problem, we think. A few times, he ended up upside down on the ground, just looking around him, but unable to right himself. Like a June-beetle fallen on its back. The hens just stood around looking at him, until we found him and set him upright again, and he just walked away as if the day was fine, stomping his feet around his favourite hens, in circles.
But these last few weeks he’s been going to bed early, and then eventually he stopped sleeping on the roost, choosing instead to nest on the wood-chipped floor outside the nesting boxes. Again and again, we found him there, with Godiva standing guard over him. His legs seemed to get weaker and weaker. He tumbled down the ramp out of his house in the mornings, rolling onto the ground and then getting up to go outside like all was well. Falling off stairs and down hills just became his way of getting around. He still found insect snacks for his ladies. He still kept his good eye trained on the sky, watching for threats as the flock foraged. He still came over to see me when I checked on him. Until one day he could barely get up at all, so we took him inside for the day. The autumn sun came out, outside the house – the same house you live in now, little Em, and where I’m still raising chickens, now. That golden light tumbled through the foggy yard and onto the browning veggies; the celery tops curling against their weakening stalks, and the empty squash vines shrinking away into the dewdrop-lit grass.
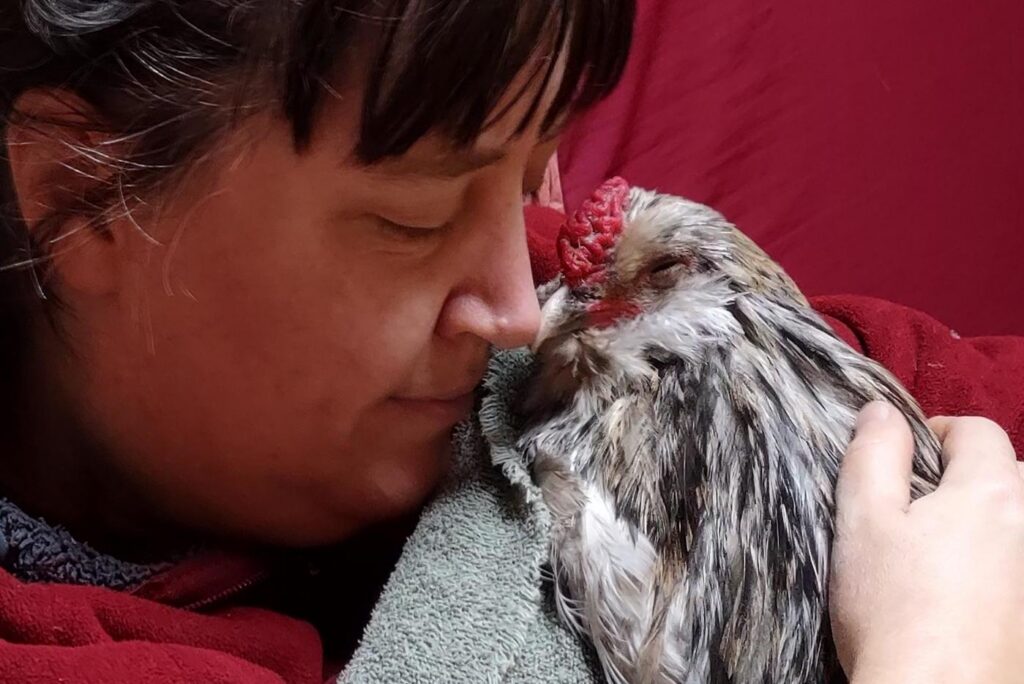
I brought him in every day and cuddled with our Splashy. I called him “my sweetheart” and “my little love”, and he closed his eyes and leaned his beak against my cheek. Pappa came by and saw him sitting in his box in the living room. He said it was cruel to keep him alive like this, and I knew he was right. But I couldn’t bring myself to kill my Splash. Not this rooster. So again, we carried him out to the chicken house and put him to bed on the chips. Godiva came to stand by him again, and he pecked her, sending her away. He slept alone. The next day he couldn’t get up at all.
That day was beautiful. The dew dried right off the whole yard and the sun warmed everything. The light was orange, almost like during a wildfire, but pinker, too, this time, like it was beckoning Splashy to join it. I laid him on the grass and brought him blackberries and other treats. He shared them with all the older hens, pecked the younger ones to keep them at bay, and Godiva never came back to him.
As the sun set, Splashy’s flock took themselves to bed without him, and he looked up at me with his one good eye. I knew it was time, but I didn’t know what to do. I asked our partner to bring me the sharp knife and a towel, and then I just sat there in the deepening evening with our brave little man on my lap. Our partner dug a hole next to the chicken run, where Splashy could always be close to his flock, and I said, “should I kill him at the side of the hole, on the ground, or in my lap?”
“I don’t know,” our partner replied. We were both empty of reason and joy.
I decided the hole was more practical, so I knelt down beside it, the knife in one hand, and my little white splash rooster in the crook of my other arm. I laid him down against the ground and he gave a huge flap, writhing his whole body as if to save himself. I was so alarmed and upset I jumped up, saying, “oh no!” And “I can’t do this!”
Then I sat back on the chair we’d been in for hours, letting Splashy settle back onto my lap. He looked straight in my eyes, and then rolled over on my lap, stretching his legs and breast out as far as he could. He stretched his neck out too, baring his throat to me, and waited. I held the sharpest knife against his throat, and in a rare and awful stroke of misluck, I failed to cut through his skin. Horrified, I gasped, and he just lay there, still waiting. With our partner’s help, I gathered my nerves and killed the most sensitive, beautiful, brave and clever chicken I ever knew. And we shed a million tears as we buried him there with a heap of autumn marigold flowers and yarrow leaves.
It was so dark by the time our Splashy was buried, that we stood in the damp evening, looking up together at the darkening sky, waiting for the stars to come out. Our partner put his arms around me and we just stood there, looking sometimes at the darkness at our feet; sometimes into the deep, deep blue. And in the safe arms of my partner, I sang,
Oh watch the stars, see how they run! Oh watch the stars, see how they run! Oh the stars run down, with the setting of the sun. Oh watch the stars, see how they run!
The sun still came up the next day. Some small animal dug at the dirt over where Splashy was buried. We planted giant allium bulbs with him, and they’ll bloom next spring. At the time I’m writing to you, we’ve already introduced a new rooster to the flock, and he’s learning his boundaries from the hens. Godiva ignores him.
Little Emily, this life is full of so much pain and so much beauty. If a chicken can teach us about acceptance and love, then there is hope for our world, despite the sometimes bleak odds. The darkness falls and somebody still crows, the next morning.
Dear Little Emily, When you grow up, you’re going to keep singing with Mum, at the folksong retreats. Mostly the old ballads and work-songs that you usually sing, with all the spirituals that tie your hearts up into warm packaged balls of hope. And also sometimes songs Mum’s written. Like this one:
Well I know your Darn Dog done been here, Done been here, neighbour, done been here! I know your Darn Dog done been here, He done blessed my yard and gone.
Mum is really never going to stop writing parodies. This one is of “I Know My Good Lord Done Been Here”, and you’ll be mighty glad Daddy will be dead by the time she writes it, because he’d sure not appreciate the vain usage of his Lord’s name! Haha. Pretty sure you would have sung it to him if she was going to write it while he was alive. Sometimes you’ll be so embarrassed, though, and this is no exception, although by the time you sing this, you’ll be me—your adult self—and have learned that a little embarrassment is worth the reward of a great memory.
Good morning, Mr. Otis I wonder where you’re bound You look like you’re on a mission And you’re walking on landscaped ground
Well I know your Darn Dog done been here, Done been here, neighbour, done been here! I know your Darn Dog done been here, He done blessed my yard and gone.
One of Mum’s favourite memories to tell, is of Mickey O’Flaherty. Even his name seems to delight her, and the stories fall out of Mum all your life long. I know you know this already. You’re around ten. But it never stops—I promise.
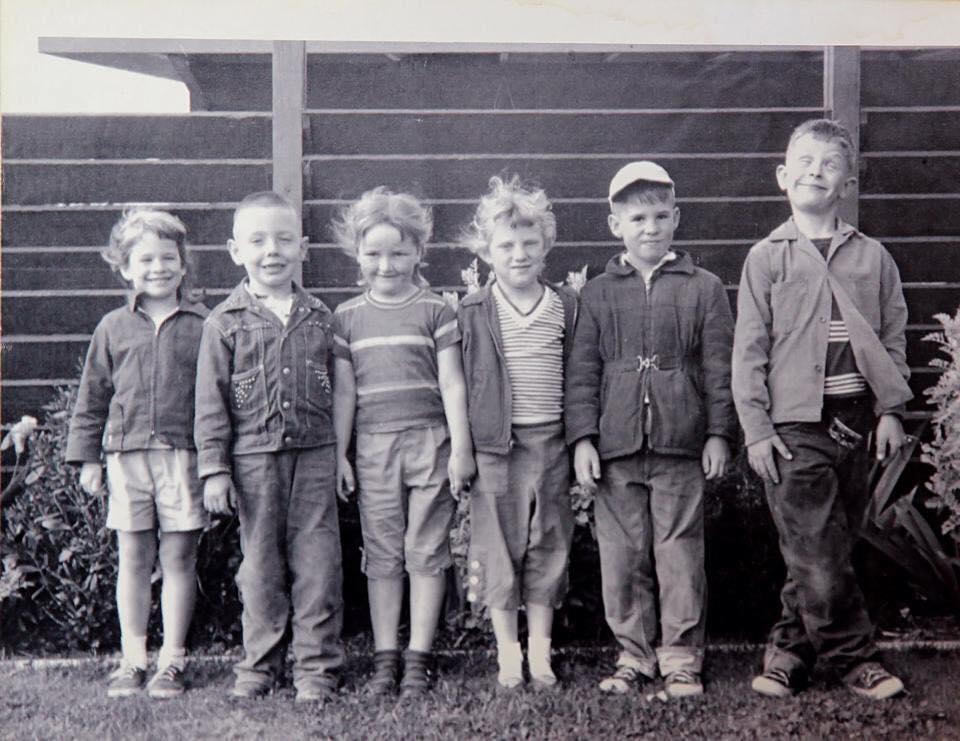
Mum has a framed photo on her wall of herself and Uncle Jim, and a bunch of their friends standing in a line on their street in Mill Valley, where they grew up. Six kids. Uncle Jim is the weirdo on the right with his legs and eyes crossed. Mum is third in from the left, and just beside her sheepish grin, Mickey O’Flaherty’s ears stick out. He looks like he’s just about to say something. Maybe that’s my imagination. He apparently had a lot to say.
Mum likes to tell about the protest signs Mickey put up on his front lawn, declaring “My Mother won’t give me hot chocolate!” and other such things. Apparently Mickey used to have breakfasts at little Mum’s house in the mornings, before they went off to school with Katie and the other kids. He spent a lot of time at Mum’s house. Grandma looked after him, I guess, because his mother was single. I guess like Mum was single for a little while after she left Daddy, and you both lived in the apartment, and Pappa brought you groceries, before he became your Pappa. So I guess maybe you have Mickey’s sense of humour to thank for Mum’s silliness. And perhaps this song.
You know that poodle Mitzi She’s easiest to find She’s just like Hansel and Gretel She keeps leavin’ her crumbs behind
Well I know your Darn Dog done been here, Done been here, neighbour, done been here! I know your Darn Dog done been here, He done blessed my yard and gone.
So the best story goes like this: There was some rude neighbour—and that’s important—he wouldn’t have met the same fate if he hadn’t been rude to children. And on top of all that, his dog used to poop all over the neighbourhood. So (and Mum swears this was Mickey’s idea), she and Mickey did a community service and picked up all this neighbour’s dog’s poop, and gift-wrapped it beautifully. They tied it up with a string and put a neatly-written note on top, that said, “Your dog did this. Be proud!” Then they set it on the neighbour’s doorstep, rang the bell, and departed. I used to walk out barefoot When I was just a lass I don’t walk barefoot anymore Because there’s danger in the grass
And I know your Darn Dog done been here, Done been here, neighbour, done been here! I know your Darn Dog done been here, He done blessed my yard and gone.
So when you’re all grown, little Emily, you’re going to make a big road-trip down the coast, with your own teenaged children, and you’ll stop in Mill Valley, on Meadow Road, to look at the house our mother grew up in. The house will look rather as she described it: A single-story home with a garage and a lawn. You can imagine little Mum on that lawn, spread out with Mickey and Katie and maybe Uncle Jim, all painting on scraps of cardboard, some kind of creative advocacy for their rights. Mum spent her whole life advocating for children’s rights, as a preschool teacher. Although by the time you’re grown she’ll be an infant development consultant, doing the same thing. Did their exploits inspire her?
Around about now, when you’re ten, Mum and Pappa want to get you a passport, but Daddy won’t allow it. He’s fighting for custody of you, and I know you’re scared. Scared that every time Mum and Pappa come back from that courtroom it will be to say goodbye; to send you off to Daddy’s house forever. I wish I could tell you right now, Mum would never let that happen. She may not have money for a lawyer, and she may just be a preschool teacher married to a bearded man with a woven tie who cringes at the sight of documents, but she knows how to speak up for herself and your rights, and she’ll find a lawyer at the last second; a friend who is a straight-standing, clean-shaven man in a crisp suit and who will walk into that courtroom and silence all those people trying to take you away from her. He’ll silence them just by walking in like he belongs there. He walks like a man who knows he’s worth something. Like maybe his mother was like your mother, and knew how to give children a voice. That friend will save your life that day, little Emily. But he’ll be there because Mum was brave enough to ask him. And maybe all of it because she and Mickey developed their voices as children, so they could speak up when others couldn’t. Good morning to you, neighbour And how do you do? I’d ask you in for coffee But you’d get dog shit on your shoe!
And I know your Darn Dog done been here, Done been here, neighbour, done been here! I know your Darn Dog done been here, He done blessed my yard and gone.
Sing the songs, little Emily. No matter how embarrassing. You never know where they came from nor what importance they carry. Sing the songs with your friends, now, and with your children and their friends, later. You’re going to be a teacher, too, and an artist, and you, too, can give people a voice, even though right now when you’re ten you don’t feel you have one at all.
I think it’s the struggle we go through as children that gives us the courage and power to stand up for others, later on. I wonder what became of Mickey O’Flaherty. What will your fear of going to Daddy’s house do for you? Your fear of speaking up, and the danger of not speaking up? I mean – I’m almost fifty, now. I kind of know what you’re going to do with your life. But I think I’ll leave that to you to discover, as you go. Sometimes the joy is in the finding. Unless it’s poop you find, I guess.
Well I know your Darn Dog done been here, Done been here, neighbour, done been here! I know your Darn Dog done been here, He done blessed my yard and gone.
Dear Little Emily is a series of letters to my childhood self, exploring loss, love, and personal growth.
~*~
Dear little Emily, Do you remember Mum’s friend Katie? I mean, of course not, because we weren’t born yet. But I know Mum told you, with a sparkle in her eyes. When Mum was a girl, and lived in Mill Valley, Katie’s mother used to take her temperature every morning before school, in the little cookie-cutter house that was just like Mum’s, and sometimes Katie would bite the thermometer in half, and pour out the silver-heavy drop of mercury into her hand, and carry it out to play with. Mum and Katie delighted at the way the mercury rolled over their hands; wondered at the pure and clandestine droplet of magic. Funny to think that it was poison, when everything about it was so curative—the thermometer, the naughtiness, and the friendship.
I was thinking of this while taking my temperature, today; looking for the fine line of silver on the old thermometer that has survived for decades while countless surely-better digital thermometers died and went to plastic heaven. Like Mum. Is there a heaven for children who grew up to have their own children, and worked their lives away, and then retired and died of brain tumours, cut just under their white and beautiful hair, just as we expected them to finally start living? Is there a heaven for children who treasured and understood the joy of play so well that they grew up to teach and care for children all their lives; to learn and practise and master the art of growing through play? Children who played with mercury? Like Mum?
Little Mum sat in her classroom after she’d moved north from Mill Valley, and stared out the window at the first snowflakes she’d ever seen. Her teacher rapped the back of her hand with a ruler, to punish her for not paying attention. Mum grew up to have her children in Canada, where she delighted in the snow falling, and rolling and jumping and sledding in it, and in skating on the frozen lakes. She took you and little Adrian out to play not only in the snow, but the waves and the forests and the fields of most beautiful grasses and flowers and insects. She married a man who brought you gifts of found animals—almost-pets that you could never keep but who opened your hearts to a sense of wonder. You and Adrian will both become teachers. You and Adrian will never stop playing, even though the constraints of our worker-hungry world will try to make you.
Right now, little me, you’re ten; maybe eleven. You think Mum’s harsh because she says you really do have to learn the long division, even though it’s obviously stupid. Like a game of numbers that has no purpose but to prove your insufficiency. Like the barely-visible stripe on the thermometer: Always insufficient. Always too low to mean staying home from school. There is no such thing as a proficient thermometer.
Mum says babies are born proficient. They can breathe, and pee and poop, and they take only a day or so to learn how to nurse; no time at all to learn to cry, to tell us they need us. They need our love. And in that warm circle of our love, they grow. By the time they’re a month old, they’re proficient at so many things, from telling us when they need a diaper change, to when they’ve had enough milk, to using their ears and eyes and fingers and tongues to explore their growing world. And as soon as we notice these proficiencies, we try to control them.
By the time they’re a few months old, babies have learned to navigate our systems and controls; to cry only enough to get what they need, even if love is not available; to make do in a world that is ever-more restrictive. They’ve learned to grow despite the challenges we present. And by the time they’re half-grown, like you are, now, my little old self, they’ve learned to hide their true selves away: to master the art of appearing-to-be-doing-something, while growing in secret; breaking the thermometer to go do science at the back fence on the way to school. By the time they’re twenty, they’ve come to recognize the restrictions were for their safety, and by the time they’re thirty-five, like Mum is now, in your world, little Emily, they’ve learned to tell their children to finish their long division homework. Even if they wish they didn’t have to.
I’m almost fifty, now, little Em. I took my temperature, today, because I have Long Covid, and I get a fever from over-exerting myself, like I did today, by visiting with my Aunties. I wanted to break the thermometer, but I guess I was never as brave as Katie from Mill Valley in Mum’s childhood. I’d be so angry if my own children behaved so recklessly. What have we done? What have we done to ourselves, and our children, and our future?
Not wanting to be the parent our mother was, but inspired by her knowledge about child development, and by my own teaching experience, I ended up unschooling our children; Mum’s grandchildren. Much to her initial concern, but I did it anyway. I explained that it was like taking the premise of her child-centred preschool and expanding it to the whole life of the child: To present and encourage opportunities for growth, and to always support the children in their endeavours, while being a bit of a safety-net, on the other side.
One day, before Mum’s dead, you will show your children the game of long division. You’ll sit them at the dining-room table, your eyes full of excitement, and show them how the numbers fall into place like satisfying blocks tumbling into their designated holes in the block-sorting-box. Your daughter will expand the game into a mind-bending board-game, and your son will revolt, but then go on to take a calculus course at a local college, in his teens. For fun. We can’t always know how a child will experience wonder, but we can make space for it.
The unschooling “worked”, you might say. Your one-day kids are grown, now, and living independently; supporting themselves with varying degrees of financial security. And they’re happy. They live their lives in the world I failed to change, but somehow they are the change. I never gave them a mercury thermometer in their lives, because I was afraid they’d break it for fun, and maybe poison themselves.
Little Emily, I’m sorry you have to do your long division. I’m sorry you also never were left with a fun little stick of mercury to break out and roll around in your palm. But you had salamanders and frog’s eggs. You had trees to climb at lunch hour. You had a mother who took snow days very seriously, as she did “town days”, which meant getting out of school and going for adventures in town. And she won’t flinch much, when you tell her her grandchildren are leaving her preschool not to go to school, at all. She’ll cringe and fight it just a little before she, like all humans do, grows from the experience. She’ll sometimes take them for town days, too. And give them silly putty to play with, even when they’re ten or eleven, and listening to music that horrifies her. She knows what matters to them, as it does to all people growing. Even to aging preschool teachers who are about to die of brain cancer, and just don’t know it yet.
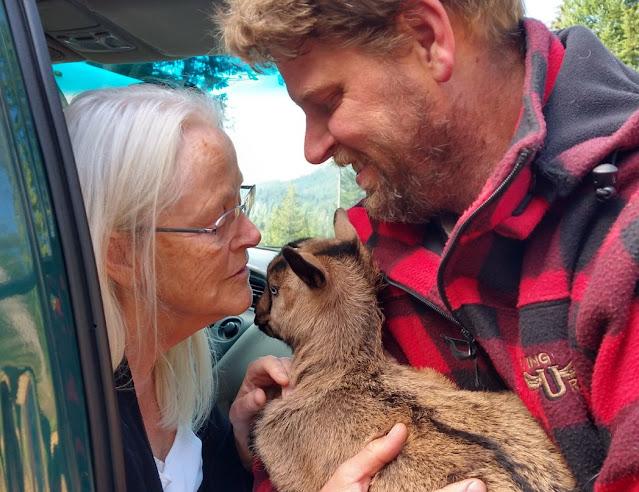
What matters is nurturing growth. Play. Discovery. Mum never lost the ability to wonder; to make space in her own life for joy. Just before she died, last year, her movements and language oppressed by the tumour’s growth in her left parietal lobe, her heart broken by the grief of saying goodbye, Mum went to visit Adrian’s new baby goats. The last trip she made outside of her house in this life was to look lovingly into the eyes of these babies as she did thousands of times in her life, with baby humans. She couldn’t speak anymore, but her eyes tell me she saw those babies’ potential. She saw their little growing selves and all the dreams they didn’t yet know they were going to dream.
Wonder. Mum didn’t look at them to see their sense of wonder, but I know that seeing the wonder in those babies’ eyes connected her to her own. The wonder we allow children to experience is what can sustain them through a lifetime of having to make do in a world that is never ideal. Wonder gives them a space to discover, learn, and grow. And in the end, when their lives are coming to an end, it gives them joy.
After Mum died, I dreamed I was holding her on my hip, and turning around in our yard, as she pointed wordlessly to the sparkling needles on the trees, the flock of singing birds flying by, and then the bulbs coming out of the snow and blooming. We turned further and she pointed at the veggie seedlings on the black earth, and the worms and beetles and pupae in the ground, bustling about their lives. We looked up, and she pointed at the sky, which had become a prismatic dome of light, shining above us, in a perfect white that somehow let its rainbow self show at all the edges. A matrix of wonder.
Little Emily, our mother was a conduit of wonder. She knew what children and all people need for growth, and she did her best to give you that gift.
Under the scribbled tentative title of the book I'm writing, on the little magnetic chicken notepad on my fridge, which probably should be used for grocery reminders, but instead is used for… random stuff, there's a quote I just can't let go of:
"In such ugly times, the only true protest is beauty." ~Phil Ochs
It's been a long time since I could see beauty. It disappeared last year, while my Mum was undergoing treatment for, and slowly dying of, a brain tumour. Now I look at the whole world she gave me–the flowers and garden; this home that I grew up in, which I raised my kids in and still rent from my father; the rain and snow and sunshine, and the deep, deep love of it all–and it looks grey. An artist friend told me that's just what depression looks like. She said it took four years for her to see colours again after her partner died. I wish I could say I'm angry about that. But I'm not, even. I feel grey about that.
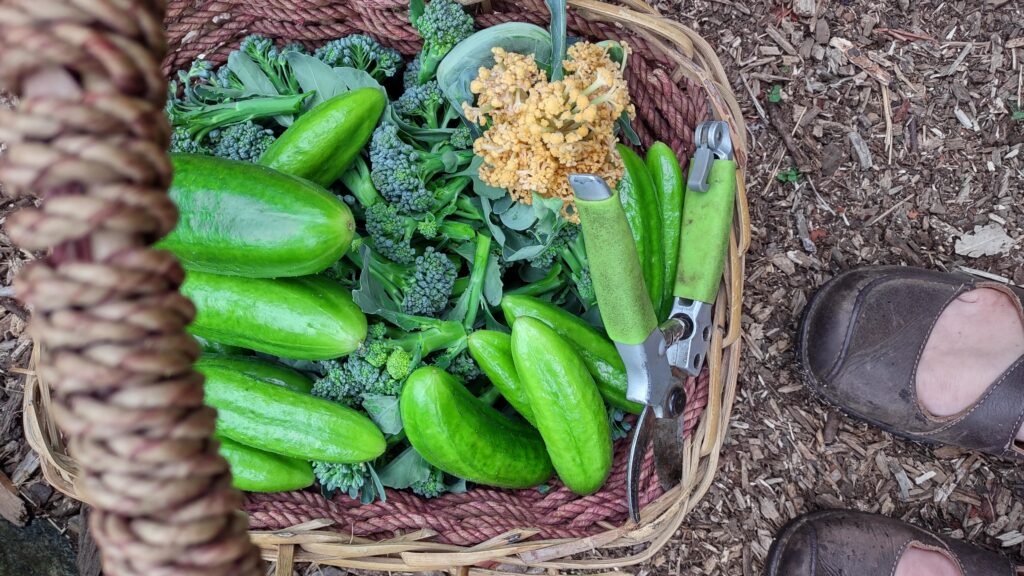
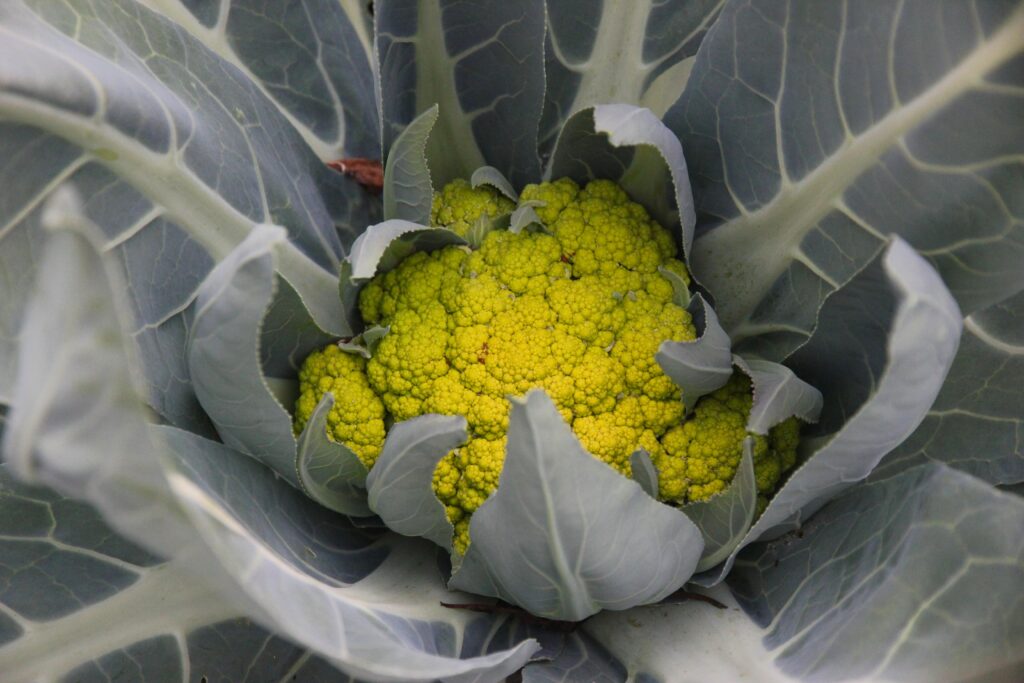
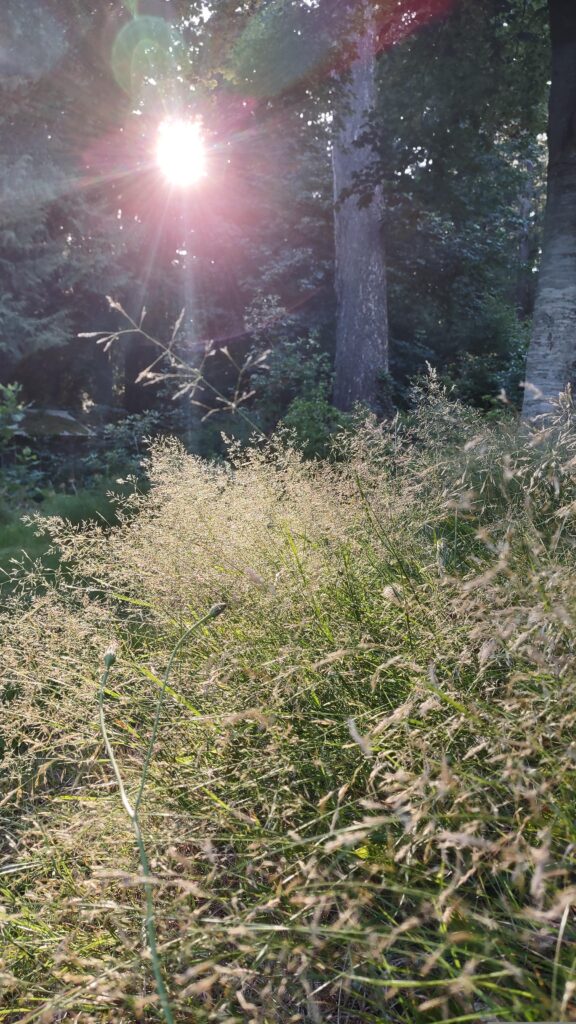
Despite this, my garden grows on. The hens have their babies, and now the whole yard is full of veggies offering themselves to the insects and the molluscs, to the chickens and to me. Full of my father walking around making nurturing adjustments to his yard and his days and his heart. Full of my partner gently going about the jobs of living, even while I've been so empty of life. Full of life, whether I see it, or not. My beautiful Mama wanted me to see it. She knew depression all her life, and she wanted me not to have that. After she died, I dreamed that she was showing me the prismatic beauty of the world. But when I woke up, it was still grey.
So I'm trying to document the beauty, again. Maybe so one day I can look back and see that it really was there, after all; maybe just so I documented what my heart can't see. Or maybe to protest the ugliness of loss.
Anyway, my hands know how to do the motions of documenting, even if my heart can't see. So here's my garden. I hope you can see it. I hope it encourages you to grow flowers, food, life, and love everywhere because even when you can't see them for the pain, these things living despite it all is what carries us through.
"Did you shuffle off the pavements just to let your betters pass?" Oil and graphite on canvas. Artist Emily van Lidth de Jeude
Thijs’ face remained open and calm as he described his childhood memory of his Jewish neighbours being removed to whatever fate they met: “I remember the SS or Germans going upstairs, kicking them down the stairs, so they rolled right on our sidewalk, in front of our door.” I was interviewing him for an installation about the concept and feeling of ‘home’, and this was part of his response. I think that I, too, looked unphased by this story. We both have lived so long in a society that treats such traumatic experiences as passing news, and turns to chemicals, distraction, or denial to keep from dwelling on the horror.
But it IS horror. It’s horror every time a starving Palestinian child tries to get food and is blown to pieces, but still alive, briefly, to witness the cries of his mother. It’s horror every time a child holds the dead face of his parent, living only in terror, oblivious to what life will be like as an orphan of genocide, however short that life may be. It’s horror every time a girl, a child; a desperate woman is captured, owned, and brutalized to feed some sick person’s illness, and then silenced, for the good of the nation, or at least for the benefit of those profiting off the nation. It’s horror every single time a person of colour, an indigenous person, a woman, or a poor person is kidnapped by brutal masked agents of terror, hiding behind anonymity and the letters I, C, and E, or simply balaclavas. It’s horror while these people sit rotting in internment camps created with the intention of brutalizing their bodies, minds, and futures. It’s horror when a child is raised with such depravity that they applied for the jobs that mean brutalizing their fellow citizens; that they are willing to create more such depravity in hopes of rising above it, for the good of the nation. For the good of the family. It’s horror when we turn away, because it hurts so much to see, and blindly, through chosen ignorance, raise our own children to be unphased by the horrors that we condone, for the good of the family.
It’s easy to buy cheap milk eked out of tortured beasts on tortured stolen indigenous land because my children need calcium, to bubble their water with a machine made on stolen Palestinian land, and to turn their eyes away from the news, towards a screen filled with shiny ads. To turn my own eyes away from how those ads are harming them, because I need time to make their dinner, and it's easier. It’s easy to allow the fascist few to benefit from our choices, for the good of the family. For the good of the nation.
What family?! What nation?! What kind of monsters are we that we can look but refuse to see?! I hear a siren right now outside my window, and I’m scared because I know that siren means someone in my community is scared, too, right now.
I can’t turn away. I can’t be the person who allows these horrors to happen, while I avert my eyes. Neither can you. I know that, because you probably looked at the news, today. You’re reading this, right now. Not to numb yourself, not to bolster ignorance, but to SEE. You’re trying to see. You’re looking to bolster community by being willing to share the suffering of others.
We know we’re bound to each other as humans. We know each child stripped of dignity, health, safety, love and life by the greed of the tiny fascist few is a part of us. We know, even, that those greedy few are part of us, so like we need to weed them out of our society, we need to weed the tendency to greed and ignorance from our own psyches. We need to rise up as individuals to save the whole of us.
I know this all sounds very big-picture. Very abstract. We want something actionable. We want to reject the rise of greed, hate, and fascism. But how? I’m working on that. I can’t say how it will look for you, but I can, at least, describe what I’m doing, and hope it helps inspire you to make whatever choices make sense in your life.
Ending Reliance on Fascist Corporations
Those photos of Trump surrounded by the tech billionaires whose private jet flights we fund with our digital existence were very enlightening, to me. I can no longer pretend a single one of them is good. Not even if they tout vaccines for impoverished populations or free transit. They’re a huge piece of the fascist landscape, and I can’t be supporting them. Obviously, it’s difficult to just quit these giants in a world that they’ve carefully arranged to be mandatory opt-in. In fact, we pay for the right to use these systems that we’ve been convinced we can’t live without!
Well, I’ve been dumping the tech giants at a steady pace for about six months, now, and I’m here to tell you it’s not only less daunting than I feared; it’s liberating!! It feels wonderful!! So here’s a list of the great alternatives I’ve found. And of course there are many more! Luckily, we live in a whole world full of caring, creative individuals, working in community to build a better world.
*NOTE: Rebel Tech Alliance, one of the groups building this better world, recently contacted me regarding this article, to point me to their amazing resource for this exact information! Do check it out; they've compiled a very useful list of options! https://www.rebeltechalliance.org/stopusingbigtech.html
…and here are my choices:
Facebook/Instagram/Twitter ⟶ Mastodon Mastodon, with it’s cute little Elephant logo, is wonderful for connecting to like-minded community. A bit of an adjustment in terms of how posting works, but not difficult, by any means. Yes, it’s part of a whole landscape of options, but you don’t even need to understand that to use and enjoy it!
WhatsApp ⟶ Signal For some reason I had the idea that Signal was for right-wing people. (?) Once I joined, I discovered that wasn’t true at all. It’s just for people. Some might be right-wing, but I wouldn’t know, just like you wouldn’t know that about your phone contacts list. It is, after all, just an app you can use for free video, phonecalling, and messaging, that uses your contacts list. But it’s an app that’s not stealing and selling your data. And yes it’s free.
News sources ⟶ Al Jazeera and local sources Obviously, this depends on where you are. But Al Jazeera definitely has a more open view of world events than any mainstream North American news sources I’ve looked at. And I augment my news intake by subscribing to local and indigenous sources that have more to say about my specific local interests.
Blogger/Website ⟶ Autistici/Noblogs Yeah!! I haven’t moved my domain name over yet, but I was honoured to be accepted by the good people who create and maintain Autistici. I’m slowly transferring all my previous content to my site there, and will redirect my domain name when I’m ready. This (moving all my content) is definitely the most daunting task I’ve undertaken, but it’s worth it, not to be chained to Google/Blogger.
Web/Chrome ⟶ Mozilla Firefox Mozilla is an amazing group of people fighting very hard to maintain fair and open internet. They make Thunderbird, which is a great email reader/system (I’ve been using it for decades), and Firefox, which is possibly the best, safest, most versatile web browser out there. Yes, it’s WAY better than Chrome!! Mozilla’s browsers are free, but you can donate if you want to. Of course the US fascist regime has cut their funding, so now is a great time to donate to such things!!
Gmail ⟶ Autistici I got a free email account with Autisici too, and use Mozilla Thunderbird to access it.
Spotify ⟶ Bandcamp I never used Spotify to begin with because the musicians I know were losing out to it from the beginning. But Bandcamp is where many of them publish, so that's what I use, or (for big-name musicians) I buy directly from their websites. Also, Bandcamp makes an expressed point of banning AI. Right on!!
YouTube ⟶ MakerTube Part of the PeerTube system, MakerTube allows creatives to upload very similarly to YouTube, but without the ads, constant AI spam, and data domination. And free, too, of course! I’m also slowly migrating my content to my new MakerTube account: https://makertube.net/c/emilyartist/videos (For video-watching, PeerTube definitely doesn't have the amount or variety of content that YouTube has, yet, but it's increasing every day! And it's real, unlike the AI dumping-ground that YouTube has become.)
Google ⟶ Ecosia On both phone and laptop, I search with Ecosia. I’ve installed it as the default search engine on my Firefox browser. While Google uses ads to raise their already astronomical profits and fund fascism, Ecosia provides the same search, but uses the ad revenue to fund reforestation. I am, however, increasingly irritated by Ecosia's deep dies to AI, and the increasingly useless search results. I may end up switching to something like Duck Duck Go.
Windows ⟶ Linux Ubuntu This was the scariest change for me, but it turned out to be both simple and amazing!! Not only are there incredibly robust and useful (free, open-source, decentralized) alternatives for every single application I previously bought or subscribed to, but the platform itself is only slightly different from the platforms we’re used to. Also: There’s an amazing community of Linux users ready to help me when I have a question!
Next I plan to replace the Android on my phone with Ubuntu touch, which will apparently relate seamlessly with my laptop, and be free (from costs, data insecurity, AND fascism!) I’m also going to get a fully repairable Fairphone.
Here are some of the apps I use, on Ubuntu. They're also available for use on Windows. Every single one of these is actually better than what it replaced for me. And free.
Word/Spreadsheet/pdf Processor ⟶ LibreOffice Image Editor ⟶ GIMP Video Editor ⟶ Kdenlive Audio Editor ⟶ Audacity Video Player ⟶ VLC (plays all kinds of things that popular players can’t)
There was one program I couldn’t get an alternative for, which is Blurb’s BookWright app. This worried me, because I do use it frequently. But it turns out there’s an easy fix for this issue! I installed Wine from the Ubuntu store, which emulates Windows, and thusly runs BookWright for me, effortlessly. That’s what’s going on in the background. What I see is just the BookWright app logo on my desktop, and it runs like there’s no background at all. 🙂
Freedom and Human Rights
At some point I realized that in almost every country, it’s illegal to live without buying or renting space on the planet. Sure, there are organizations trying to help those who can’t afford the luxury of shelter, but their goal is still to get people earning enough money to rent space. Eating is the same. You must make enough money to pay someone else to produce food, because growing it, while not always illegal, is at least only available to those who pay for space to grow it. As corporations like Nestle commandeer water resources, and municipalities begin taxing citizens for water-use, but not corporations for draining aquifers, many are now also unable to afford water. We always have to pay for our right to live. And who makes that money? Those depraved billionaires, of course. The only way to keep the basic human rights of taking up space, eating and drinking, is to exercise those rights.
I’ve noticed, personally, that when I go into the city, I feel like I need to pay for food or entertainment, if I want to sit down. To buy a cookie if I want to use a toilet. Cities offer parks and benches, of course, but I feel like there’s a growing expectation that if we’re using the spaces, we should be paying someone. The right to simply rest should not belong to the wealthy.
So taking up space is part of exercising our rights. Drink from the creek. Begin to care where it’s coming from, and who’s polluting it. Sit on the sidewalk and learn to see your neighbours. Encourage them to sit on the sidewalk, too. Plant food crops in disregarded soil. We have the right to live a good life on this earth, with the gifts this earth gives to all animals. Live it.
Activism
I’ve been severely limited by disability these last few years, and haven’t attended a single protest. Luckily, protests are not the only way to act against tyranny! They may not even be the most effective way! My auntie reminded me of this when she sent me this poem, yesterday. With a dizzying array of health problems like strokes and pneumonias that have put most of her career as a poet, performer, educator and author on hold, she still managed to write this poem, record it, and send it out. So I took one minute out of my morning and shared it on my MakerTube and Mastodon! We can ALWAYS do something.
Maybe the something looks like growing our own food, and sharing the bounty with neighbours. Maybe it looks like writing to people in position to make political or corporate change. Maybe we can make change by choosing how and where we spend our money, or earn it. Maybe we reject industries and products we know to be harmful. My son messaged me yesterday to say he sadly forgot to ask for oat-milk in his cappuccino. Why? I asked him. His answer was that the dairy industry is terrible. We didn’t talk about the coffee industry, but it’s a small thing to request oat milk instead of dairy. Maybe coffee is next. We make a journey by taking one step at a time, and every step matters.
The solution to so many of the world’s problems seems to be thoughtfulness. Awareness. Like when I talked about drinking from a stream, to allow us to take stock of who’s polluting that stream, we need to go through our lives with our eyes open, so that we are compelled to make the changes necessary to live well.
The people who profit off of our ignorance pay big money to maintain that ignorance. But we still have the power to open our eyes. To witness and make choices. When Thijs watched his Jewish neighbours rolled out onto the street he didn’t look away. In fact, eighty-odd years later, he’s still telling the story. Still using his traumatic experience of witnessing genocide to educate; to help all of us to open our eyes.
We’re all witnessing genocide, today. We’re all witnessing a rise of fascism that is stunning in its similarity to what Thijs and many of our elders experienced less than a hundred years ago. It’s up to each of us to not turn away. To not accept. To not condone. To not support fascism.
I know it's not so simple. We're funnelled into supporting fascism with every breath we take. But this is war, now. We're dying from our apathy, and the only thing that will save us is taking responsibility for the change. Nobody else is going to do it for us. As Sinéad O'Connor sang in "Drink Before the War", "Somebody cut out your eyes, you refuse to see". They can force us all they want, but the choice to see or not to see is still ours.
It’s up to each of us to build the world that feeds the many instead of the few. It’s up to each of us to look at our own hands and be sure they’re doing work we’re proud of. It’s up to each of us to open our eyes and become aware of the consequences of every action we take, and only take actions we’re proud of. For the good of the family. For the good of all people, and the future and ecology that feeds us, we must open our eyes and choose to see.
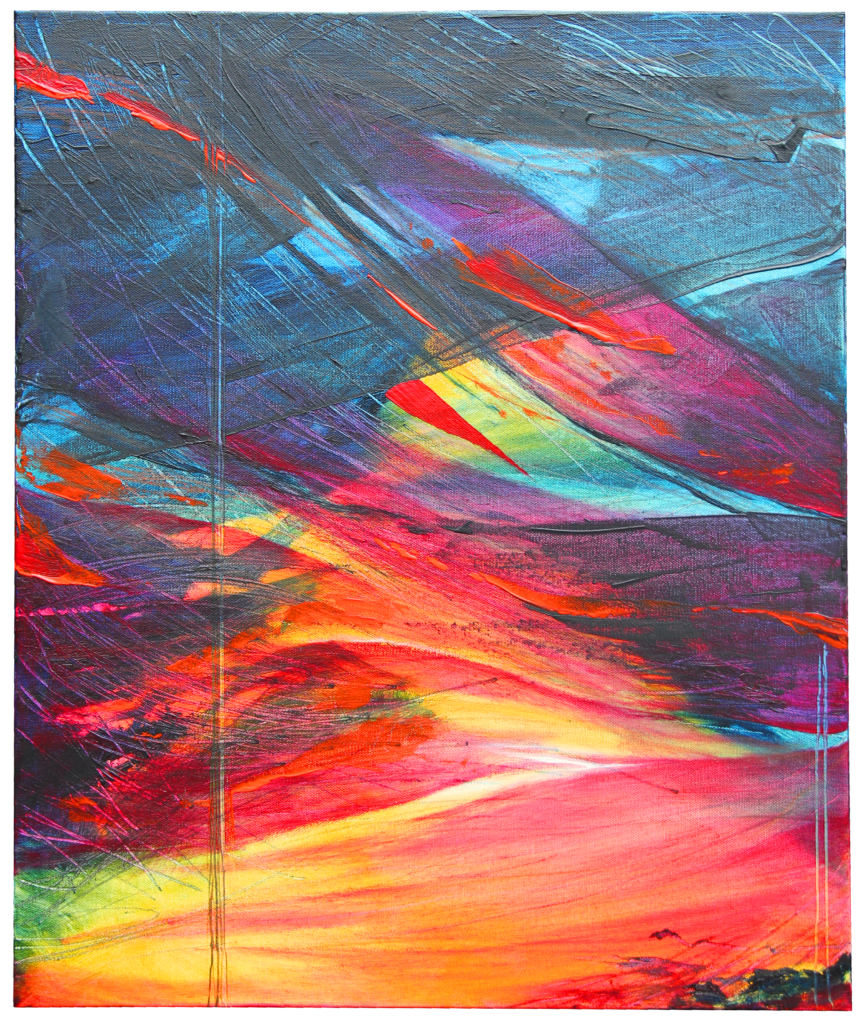
"Drink Before the War" Oil and graphite on canvas. Artist Emily van Lidth de Jeude
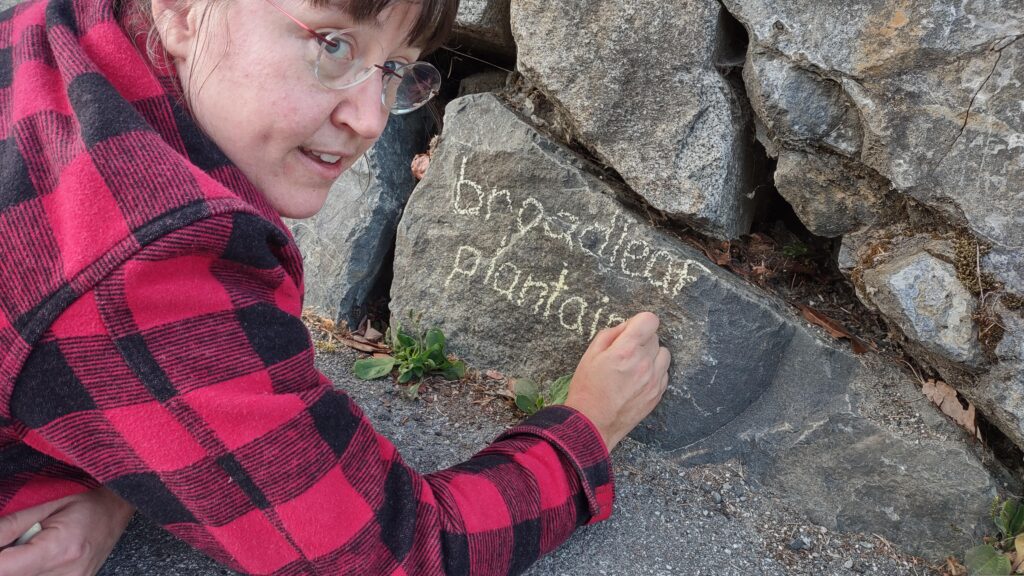
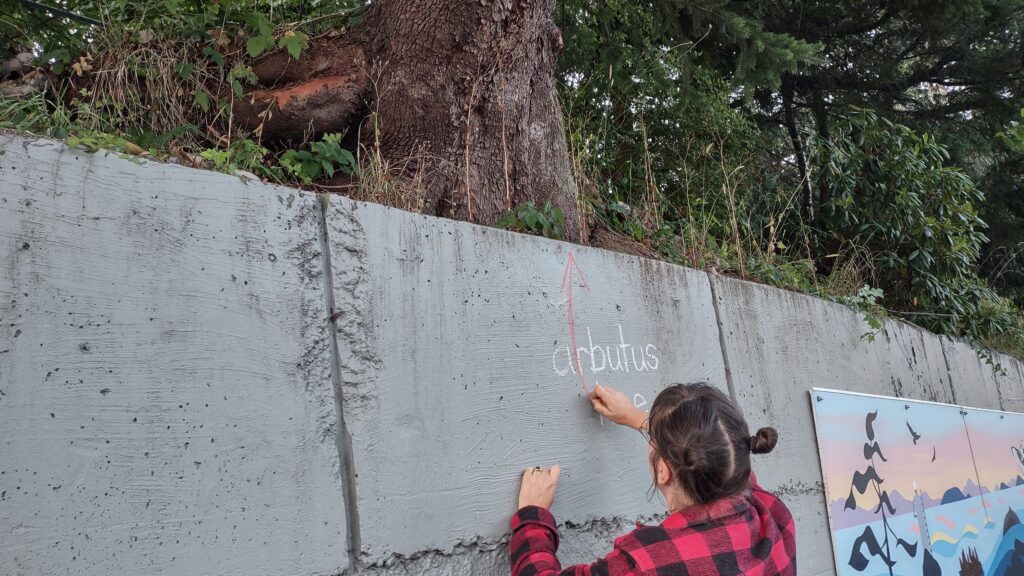
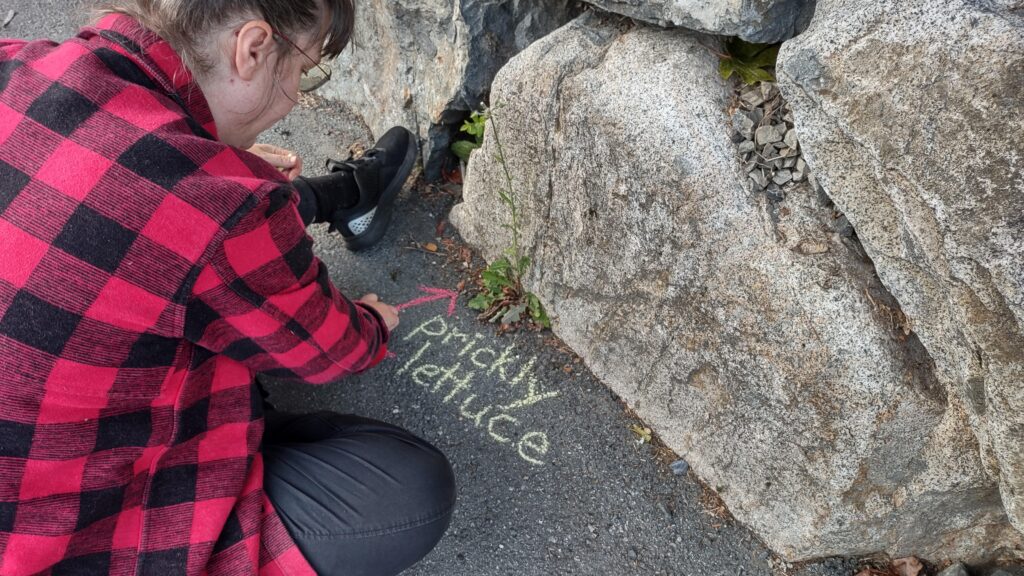
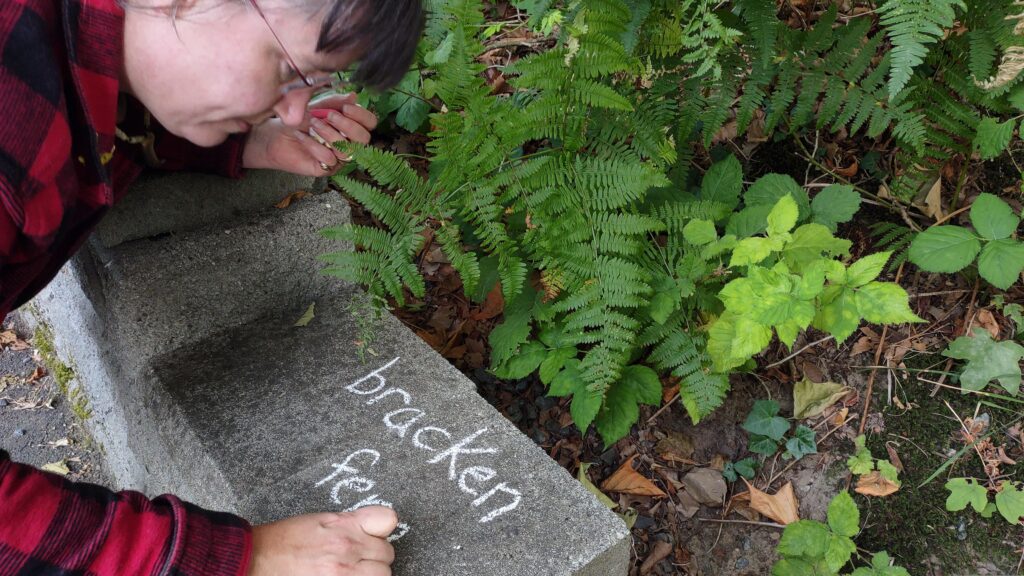
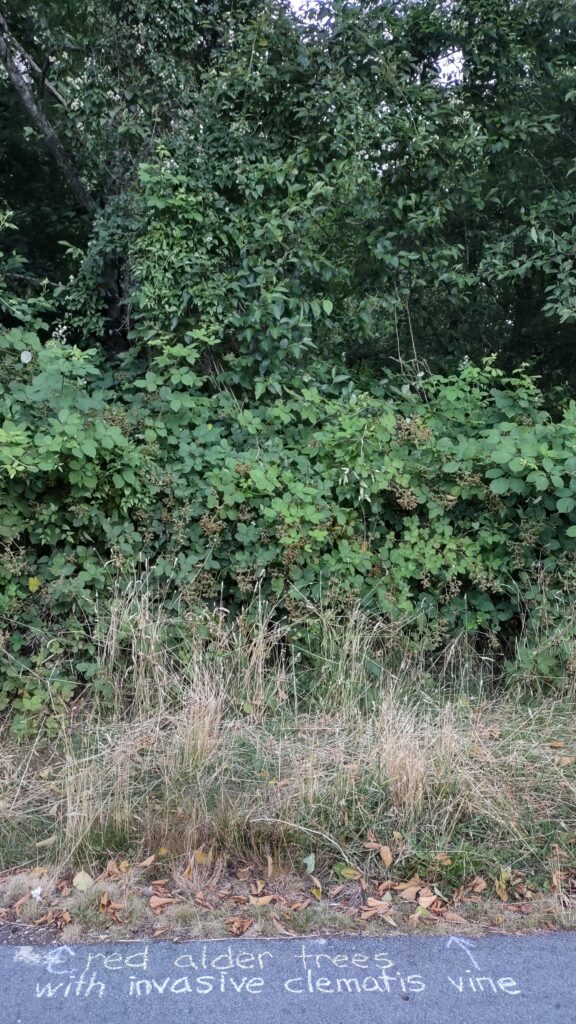
This has become one of my favourite things to do. Every year I go out and label the weeds and trees in the place with the highest foot-traffic on our island.
I hope people see these and begin to notice a bit of the world around them in ways they may not have, before. I hope people also go home and find the same weeds, there. Sure, it's the simplest kind of art.
I'm just chalking rocks, walls, and sidewalks with plant names! But I really feel it might be one of the most impactful works I've done.
And yes, if you're wondering, I do have municipal permission to do this! So the credit for this also goes to open-minded officials and other citizens who can appreciate the benefits of art and education in our communities. 🙂
As artists, we have the power, ability, and honour of building our future civilization. Some of us may be doing so intentionally; many not. But whether we're aware of it or not, we are responsible.
Sci-fi is often touted as predicting the future. But does it? Writers and other artists imagine plausible eventualities based on current directions and capabilities… and then they often happen. Maybe the artists are soothsayers, or more likely we're just creative… and humans have evolved by being resourceful. If we're given a wild idea, we take great pleasure in making the seemingly impossible happen. So maybe artists are visionaries. That's not a pat on the back. Most of us want to be seen as visionaries, I suspect, but it's a huge responsibility.
What are we putting out into the world? Books, movies, and other art that may very well have been intended to warn us away from a dystopian future might instead be creating it; putting the ideas for such dystopia into our minds so that our resourceful society will create it. I'm not talking about some evil genius who sits in their dark basement playing apocalypse video games and then thinks, "ooooh I could destroy the world… bwahahahahaaaa!" I'm talking about all of us becoming gradually more and more accustomed to seeing and hearing about such dystopian events so that as they happen, we don't stand up and stop them.
What are artists supposed to do? Become blind Pollyannas and make fluff? Cotton candy dreams with no real plot and no intrigue? No, of course not. Nobody would look, at all. People like to look at what terrifies us. And art needs to deal with our problems, too; not just look the other way. I'm totally not immune to creating work that deals with humanity's pain and failings. But I also feel that we need to be creating work that posits hopeful futures. We need to be imagining the world we want to see, instead of the one we're afraid of.
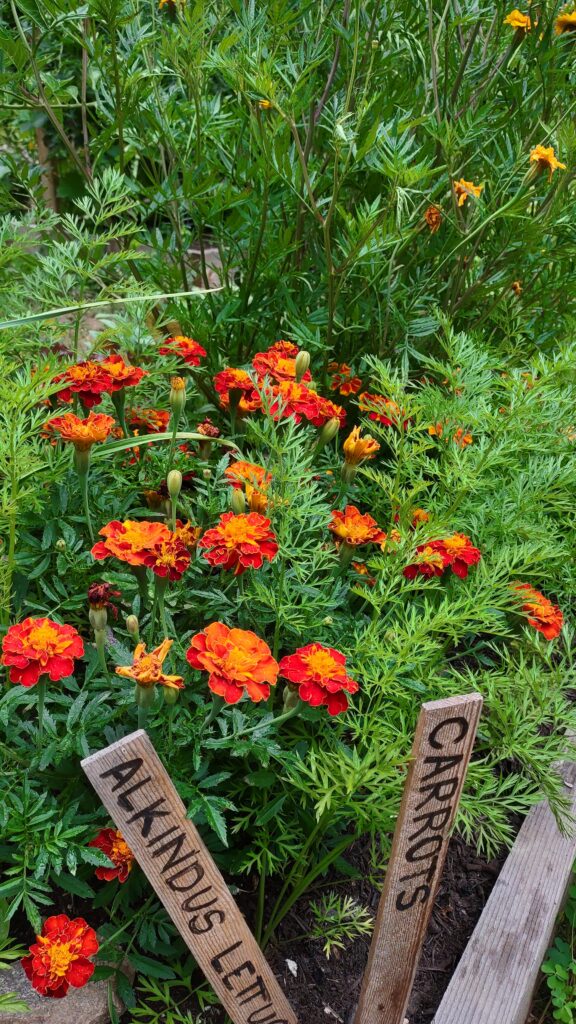
And luckily, we have nature to look at, for inspiration. Nature is resourceful and opportunistic and ruthless. And extremely beautiful. The whole of nature evolves because of these things, and humans are definitely part of that whole. Nature limits itself simply because it's impossible to keep living if one devours all one's resources at once. I keep an ecosystem-integrated food forest around my home, which teaches me this every year. This year we're having quite an infestation of flea beetles. In previous years it was cabbage moths and one year–spectacularly–it was mourning cloak butterflies. But each of these infestations either destroys it's own habitat and thereby starves itself out, or attracts some kind of predator that eats it alive. Nature limits greed. So, despite my current paltry pea crop, due to the flea beetle infestation, I'll still have food, because my garden is diverse, and next year I don't expect to have such an issue with flea beetles. They've destroyed so many of their resources and attracted so many predators that they can't be such a problem, next year. Humans are in the process of self-limiting, as well, painful though it is for us as individuals.
Contrast my garden flea beetle situation to a garden where all that's planted is peas (because: monocrop=money). The flea beetles now threaten the entire garden, as opposed to just the peas and the odd brassica or tomato, here and there. So now all we see as farmers is the flea beetle problem. And we blast them all to hell with pesticides. Now we have peas, and we make money, but we're poisoning ourselves and the land, and most of the other species that live on it. So in a couple of years of this practice, we've devastated our ability to grow peas, or perhaps anything at all on that piece of land, because we no longer have the diversity of life needed to sustain… life.
It doesn't take much vision to see that that way of farming (or living, or envisioning our human future) is hopeless. It takes a little more vision to imagine and create a hopeful future.
As an artist, I'd like to be one who plants more diversity, in preparation for new ways of living, instead of just imagining bleak futures for us to tumble numbly into. Humanity might indeed extinguish itself by imagining negative futures. But the life of this planet will go on. Yes, it will be utterly changed, because human folly is powerful, and we're destroying life at an ever-increasing rate. But some kind of collection of species (likely including some humans) will carry on beyond our rather short-lived civilization, and will develop its own rich community of life when it settles into the cradle that this planet offers. This new collection of species will imagine itself and grow into what it imagines. And, like my garden, the more diverse this new ecosystem is, the more resilient it will be.
I love to feel the responsibility of such a future. Let's imagine!